Gherkio Documentation
The Declarative Integration Testing Platform — Build bulletproof API test suites in pure YAML. No boilerplate, no runtime compilation, zero custom glue-code required.
Gherkio is a declarative integration testing platform that compiles to a single static Go binary. Teams use it to write API integration tests by describing HTTP request sequences, assertions, and variable extractions in pure YAML — no imperative code required. It features a native MCP server for AI assistant integration, outbound network sandboxing for security, and structured reporting for CI/CD pipelines.
API testing has traditionally been trapped between two bad options: click-and-point GUI client workbooks that cannot scale under continuous integration, and heavy codebases written in JavaScript, Python, or Go that suffer from dependency bloat, fragile custom assert frameworks, and poor readability.
Gherkio offers a professional third path: a single, self-contained binary that executes highly readable, multi-step declarative testing scenarios defined in simple YAML.
scenario: Authenticate & Retrieve Profile
steps:
  - request:
      method: POST
      url: /auth/login
      body:
        username: $accounts.admin.username
        password: $accounts.admin.password
    expect:
      status: 200
      body.token: exists
    save:
      jwt: body.token

  - request:
      method: GET
      url: /auth/me
      headers:
        Authorization: Bearer $jwt
    expect:
      status: 200
      body.role: admin
⚡ Key Value Pillars
🟢 1. Built for Speed and Ephemeral CI
Written in pure Go, Gherkio compiles to a single static binary with zero external runtime dependencies. Boot up tests instantly inside empty Docker instances, local terminals, or standard GitHub runner nodes.
🟢 2. Declarative Syntax as Single-Source-of-Truth
Because scenarios are written in pure YAML, your API test files double as live, executable documentation. Developers, QA specialists, and product managers can read, write, and audit scenario steps without needing to understand complex software architecture.
🟢 3. Industrial-Grade Native Ecosystem
Forget writing custom wrapper functions. Gherkio features native support for JWT assertions, automatic credential masking, exponential-backoff retries, multi-role account loops, full JSON schema matching, and timing budgets right out of the box.
🟢 4. Agentic AI Ready (Model Context Protocol)
Gherkio includes a native Model Context Protocol (MCP) server that exposes your testing sandbox directly to AI developer assistants (like Cursor, Windsurf, or custom Claude Desktop environments). Let AI agents draft, execute, validate, and debug integration tests automatically inside your project workspace.
🗺️ Developer Onboarding Roadmap
To learn Gherkio systematically, follow our structured, progressive onboarding chapters:
| Step | Section | Description |
|---|---|---|
| 1 | 🚀 Getting Started: Installation | Install pre-compiled binaries or run dynamically with zero-install Go run directives. |
| 2 | ⏱️ Getting Started: 2-Minute Quickstart | Scaffold your first testing sandbox and see Gherkio's console reporting in action. |
| 3 | 📁 Getting Started: Project & Folder Setup | Master config files, environments overrides, and microservice hosts mapping. |
| 4 | 📝 Tutorial: Build Your First Test | Step-by-step walkthrough detailing request modeling, data assertions, and variable saving. |
| 5 | 🎨 Interactive Browser Playground | Visualize test steps dynamically and convert legacy cURL statements instantly. |
| 6 | ❓ Frequently Asked Questions | Common questions about setup, credentials, CI/CD, and troubleshooting. |
Getting Started with Gherkio
Welcome to Gherkio! This guide is structured to take you from a complete beginner to writing and orchestrating advanced declarative integration tests in minutes.
🗺️ Progressive Onboarding Journey
To get the most out of Gherkio, follow this recommended step-by-step onboarding roadmap:
graph TD
    A[1. Introduction] --> B[2. Installation]
    B --> C[3. 2-Minute Quickstart]
    C --> D[4. Project Setup]
    D --> E[5. Build Your First Test]
    E --> F[6. Interactive Playground]
- Installation: Compile from source or fetch compiled binaries for Linux, macOS, or Windows.
- 2-Minute Quickstart: Scaffold a testing sandbox with
gherkio initand execute your first local test scenario. - Project & Folder Setup: Master Gherkio's folder layout, configuration overrides, and environments.
- Tutorial: Build Your First Test: A hands-on walkthrough guiding you from an empty file to a multi-step variable-injecting test flow.
- Interactive Browser Playground: Visualize YAML steps and translate legacy cURL statements instantly in your browser.
💡 Why Gherkio?
Traditional API integration testing requires writing hundreds of lines of boilerplate code in Javascript, Go, Python, or Java. This code quickly becomes unmaintainable, suffers from runtime syntax errors, and is difficult for non-engineers (like Product Managers or QA specialists) to read.
Gherkio solves this by introducing a Declarative YAML Domain Specific Language (DSL):
| Feature | Gherkio (Declarative YAML) | Traditional Code (Imperative) |
|---|---|---|
| Readability | 🟢 Extremely high. Reads like a technical spec. | 🔴 Low. Hidden under imports, async blocks, and classes. |
| Maintenance | 🟢 No compiling or dependency management. | 🔴 Constant node/go module security updates. |
| API Assertions | 🟢 Zero-boilerplate body.role: admin | 🔴 Bulky expect(res.body.role).to.equal("admin") |
| AI Generation | 🟢 Near-perfect accuracy due to strict schema rules. | 🔴 Prone to syntax hallucinations, imports, and compiler issues. |
⚡ Core Concepts to Remember
As you read the documentation, keep these three structural pillars in mind:
- Scenarios: A scenario is a list of sequential HTTP request steps representing a user journey (e.g. Login ➔ Create Cart ➔ Checkout).
- Environments: Define your target base hosts (e.g.
https://api.staging.company.com) without hardcoding them in test files. - Variables: Save response fields dynamically (
save: authToken: body.token) and reuse them in subsequent headers or bodies (Authorization: Bearer ${authToken}).
🎯 Gherkio Philosophy
Gherkio is built on a simple, uncompromising core principle:
Integration testing should describe what behavior to orchestrate, not how to implement it.
- Declarative-First: Scenarios describe high-level API workflows rather than writing custom test scripts or boilerplate code.
- Readability Matters: Integration tests are written to be easily read, audited, and maintained by anyone on the team after 1–2 years.
- Deep Observability: Every execution outputs structured, high-precision payloads and validation tracebacks so failures are debugged instantly.
- Constrained DSL: No arbitrary coding loops or complex branching inside test files—forcing tests to stay clean, predictable, and robust.
Installation
Gherkio is compiled as a single self-contained binary with zero external dependencies. You can install it using Go or by downloading pre-built binaries.
🛠️ Requirements
- Operating System: Linux, macOS, or Windows.
- Go Version (if installing from source): Go 1.25+
- HTTP client:
curl(optional, for bidirectional conversion tools).
📦 Install Options
1. Using Go Install (Recommended)
If you have Go installed on your system, run:
go install github.com/muhfaris/gherkio@latest
This compiles the binary and places it under your $GOPATH/bin or $GOBIN directory. Make sure this directory is in your system's PATH.
2. Pre-Built Binaries
For systems without Go, download the latest compiled binary from the GitHub Releases page:
- Download the archive matching your operating system and architecture (e.g.
gherkio_Linux_x86_64.tar.gz). - Extract the archive:
tar -xzf gherkio_Linux_x86_64.tar.gz - Move the binary to a directory in your executable path:
sudo mv gherkio /usr/local/bin/
3. Zero-Install Execution (Go Run)
If you have Go installed but do not want to compile or place the Gherkio binary permanently on your local system path, you can run Gherkio directly from the remote repository using go run:
# Initialize a project sandbox
go run github.com/muhfaris/gherkio@v0.1.0-alpha.5 init

# Execute tests
go run github.com/muhfaris/gherkio@v0.1.0-alpha.5 run .gherkio/tests/example/login.yaml
This is the perfect approach for quick trial runs or executing Gherkio inside ephemeral, single-use CI/CD runner pipelines.
✅ Verifying Installation
Verify that Gherkio is installed correctly by checking its version:
gherkio --version
You should see an output similar to:
gherkio version v0.1.0-alpha.5 (commit: 45edd86, built: 2026-05-31, go1.26)
Quickstart
Start testing your HTTP APIs with Gherkio in under 2 minutes. We will initialize a sandbox project, review the generated declarative scenario, and execute it.
🚀 1. Initialize a Project
Create a new directory for your test suite and run gherkio init:
mkdir my-api-tests && cd my-api-tests
gherkio init
💡 Zero-Install Alternative: If you do not have the binary installed on your local system path, you can run all Gherkio commands using standard remote Go execution:
go run github.com/muhfaris/gherkio@v0.1.0-alpha.5 init
This scaffolds the canonical Gherkio folder structure:
.gherkio/
├── config.yaml
├── credentials/
│   └── local.yaml
├── environments/
│   └── local.yaml
├── schemas/
│   └── example/
│       ├── login-response.yaml
│       └── user-response.yaml
└── tests/
    └── example/
        ├── accounts/
        │   └── login-as-alice.yaml
        ├── auth/
        │   ├── login.yaml
        │   ├── me.yaml
        │   └── refresh.yaml
        └── builtins/
            └── login-with-generators.yaml
📝 2. Review the Example Test
Gherkio created a pre-configured example test under .gherkio/tests/example/auth/login.yaml. Open it to see the declarative YAML DSL:
scenario: login example

steps:
  - request:
      method: POST
      url: /auth/login

      body:
        username: $username
        password: $password
        expiresInMins: 30

    expect:
      status: 200
      body.accessToken: exists
      body.refreshToken: exists
      body.email: email
      schema: example/login-response

    save:
      accessToken: body.accessToken
      refreshToken: body.refreshToken
🏃 3. Run the Test Scenario
Run the scaffolded test using gherkio run:
gherkio run example/auth/login.yaml --verbose
💡 Zero-Install Alternative: You can run Gherkio dynamically without installing using
go run:go run github.com/muhfaris/gherkio@v0.1.0-alpha.5 run example/auth/login.yaml --verbose
The --verbose flag shows full request and response payloads with automatically masked credentials.
You will see the step-by-step console printer output and a final test summary:
✔ Step 1: POST https://dummyjson.com/auth/login [200 OK] (182ms)
  ✔ Assertion: status == 200
  ✔ Assertion: body.accessToken exists
  ✔ Assertion: body.refreshToken exists
  ✔ Assertion: body.email matches format email
  ✔ Assertion: response conforms to schema: example/login-response
  → Saved accessToken: eyJhbGciOi...
  → Saved refreshToken: rGhyTk83...

=======================================================
SCENARIO RESULT: PASSED
Total Steps: 1 | Passed: 1 | Failed: 0 | Duration: 182ms
=======================================================
Project Setup
Learn how Gherkio structures its folders, configures environments, and maps services for declarative integration testing.
📁 The .gherkio/ Directory Layout
All Gherkio configuration, variables, tests, schemas, and reports reside inside a single, hidden .gherkio/ folder at the root of your repository:
.gherkio/
├── config.yaml                     # Global test execution config
├── credentials/                    # Environment-specific usernames & keys
│   └── local.yaml
├── environments/                   # Target API hosts and service mappings
│   └── local.yaml
├── schemas/                        # Reusable JSON/YAML validation schemas
│   └── example/
│       ├── login-response.yaml
│       └── user-response.yaml
├── tests/                          # Your declarative YAML test scenario suites
│   └── example/
│       ├── accounts/
│       │   └── login-as-alice.yaml
│       ├── auth/
│       │   ├── login.yaml
│       │   ├── me.yaml
│       │   └── refresh.yaml
│       └── builtins/
│           └── login-with-generators.yaml
└── reports/                        # Automatically generated test run logs & HTML reports
    ├── archive/
    ├── failures/                   # Dynamic JSON snapshots for failed assertions
    └── latest/
⚙️ Global Configuration (config.yaml)
The global configuration file handles execution defaults, reporting, credential masking, and request sandboxing. Gherkio uses these fields to coordinate runtime behavior:
gherkio_version: 0.1.0

# ----------------------------------------------------------------------
# 1. Project Metadata
# ----------------------------------------------------------------------
project:
  name: "my-api-testing-suite"
  version: "1.0.0"

# ----------------------------------------------------------------------
# 2. Environments Directory Configuration
# ----------------------------------------------------------------------
environments:
  default: local                    # Default environment if --env is omitted
  path: .gherkio/environments       # Path to environment configurations

# ----------------------------------------------------------------------
# 3. Tests & Scenarios Configuration
# ----------------------------------------------------------------------
tests:
  path: .gherkio/tests              # Directory where test scenarios reside

# ----------------------------------------------------------------------
# 4. JSON Schemas Configuration
# ----------------------------------------------------------------------
schemas:
  path: .gherkio/schemas            # Directory containing validation schemas

# ----------------------------------------------------------------------
# 5. Reports & Core Failure Snapshots
# ----------------------------------------------------------------------
reports:
  path: .gherkio/reports            # Output path for test summaries
  format: html                      # Report format ("html", "json", or "html,json")
  archive: true                     # Keep a history of past reports
  retention: 10                     # Keep up to 10 historical reports
  maskSensitive: true               # Mask credentials in HTML report pages
  failures:
    enabled: true                   # Write detailed JSON debug snapshots on failures
    path: .gherkio/reports/failures # Directory for failure snapshots
    maskSensitive: true             # Mask credentials in failure dumps
    retainCount: 50                 # Retain up to 50 debug snapshots

# ----------------------------------------------------------------------
# 6. Security and Sandboxing (Policy Engine)
# ----------------------------------------------------------------------
security:
  mask:
    enabled: true                   # Enable masking of sensitive fields in outputs
    fields:                         # Case-insensitive sensitive keys to redact
      - password
      - token
      - secret
      - Authorization
  sandboxing:
    enabled: true                   # Enforce outbound network boundaries
    allowedDomains:                 # Allowed target domains (supports wildcards)
      - "*.company.com"
      - "api.stripe.com"
    blockedDomains:                 # Explicitly blocked targets
      - "analytics.untrusted.com"
    blockPrivateSubnets: true       # Prevent loopback (127.0.0.1) and private IP calls
🔒 Security & Sandboxing Policies
Gherkio includes a native, industrial-grade outbound traffic sandbox and credential masking engine to secure enterprise testing pipelines and prevent security risks (like SSRF or private data leaks).
1. Credentials & Token Masking (security.mask)
To prevent sensitive keys, tokens, or credentials from leaking into test summaries, build logs, and console outputs, Gherkio scans response JSON keys and HTTP headers to mask matching fields.
enabled: (boolean) Turns output redacting on or off.fields: ([]string) List of case-insensitive JSON paths or header keys to mask. When found, values are replaced with[MASKED].- Built-in Defaults (automatically masked):
token,accessToken,access_token,refreshToken,refresh_token,password,secret,clientSecret,client_secret,apiKey,api_key, andauthorization(case-insensitive). You can add custom fields to this list; the built-in defaults remain active.
- Built-in Defaults (automatically masked):
2. Domain & Outbound Sandboxing (security.sandboxing)
The sandboxing engine controls which external network servers Gherkio is allowed to communicate with. If a test scenario attempts to hit a blocked or unlisted host, Gherkio halts the step immediately before performing the HTTP call.
enabled: (boolean) Enforces network boundaries.allowedDomains: ([]string) White-list of target endpoints. Supports simple wildcards (e.g.*.company.commatchesapi.company.comandweb.company.com). If left empty, all domains not explicitly blocked are allowed.blockedDomains: ([]string) Explicit black-list of endpoints. Take precedence over allowed domains.blockPrivateSubnets: (boolean) When set totrue, Gherkio resolves the target domain's IP addresses via DNS lookup prior to execution. If the resolved IP belongs to a local or private subnet (e.g.127.0.0.1,::1,10.0.0.0/8,192.168.0.0/16), the request is immediately rejected. This prevents SSRF (Server-Side Request Forgery) attacks and unauthorized internal port scanning.
🌐 Configuring Environments
Managing tests across local, staging, and production environments can easily lead to configuration bloat. Gherkio solves this using a declarative environment mapping strategy.
All target environment host files reside as separate YAML configurations inside .gherkio/environments/ (e.g. local.yaml, staging.yaml, production.yaml). You switch environments instantly via the CLI flag:
gherkio run example/auth/login.yaml --env staging
1. The Environment Configuration Schema
Each environment file has a simple, clean, but highly extensible schema:
| YAML Key | Type | Required | Description | Example |
|---|---|---|---|---|
baseUrl | string | Yes | The default host URL. Used as a prefix for all relative URL request steps. | baseUrl: https://api.staging.company.com |
services | map[string]Service | No | Overrides for specific microservices or downstream third-party APIs. | (See below) |
services.<name>.baseUrl | string | Yes | The service-specific host URL prefix. | baseUrl: http://auth-service:3000 |
2. Multi-Service Microservice Routing
In modern cloud-native architectures, single scenarios often span multiple distinct backend microservices (e.g. creating a user on the Auth API, making a charge on the Payment API, and verifying stock on the Inventory API).
Gherkio allows you to declare all service endpoints in a single environment configuration, and route requests dynamically on a step-by-step basis:
Environment Config: .gherkio/environments/staging.yaml
# Global default fallback
baseUrl: https://api.staging.company.com

# Microservice host overrides
services:
  auth:
    baseUrl: https://auth.staging.company.internal
  payments:
    baseUrl: https://payments.staging.company.internal
  notifications:
    baseUrl: http://localhost:8080   # Port-forwarded or local mock service
Test Scenario Routing: .gherkio/tests/orders/checkout.yaml
scenario: Complete Order Checkout Flow
steps:
  # 1. Routes to Auth Service (https://auth.staging.company.internal/session)
  - request:
      method: POST
      service: auth
      url: /session
      body:
        token: $accounts.customer.apiKey
    save:
      authToken: body.accessToken

  # 2. Routes to Payments Service (https://payments.staging.company.internal/charges)
  - request:
      method: POST
      service: payments
      url: /charges
      headers:
        Authorization: "Bearer ${authToken}"
      body:
        amount: 4500
        currency: usd
    expect:
      status: 201

  # 3. Routes to Default baseUrl (https://api.staging.company.com/orders)
  # (No service tag is declared, so it defaults to the root baseUrl)
  - request:
      method: GET
      url: /orders
      headers:
        Authorization: "Bearer ${authToken}"
    expect:
      status: 200
3. URL Precedence & Resolution Formula
When Gherkio executes a test step, it parses the target endpoint according to the following strict order of precedence (highest to lowest):
[1. Absolute Step URL]    -->  - request: { url: "https://google.com" } (Overrides everything)
            ↓
[2. Named Service Route]  -->  - request: { service: "auth", url: "/login" } (Resolves via services map)
            ↓
[3. Default Base URL]     -->  - request: { url: "/login" } (Resolves via root baseUrl)
💡 Best Practice: Keep scenario steps generic by using relative paths (e.g.,
/users). Never hardcode staging or production domain names inside your YAML test scenarios. This ensures that the same scenario runs flawlessly across all pipelines simply by swapping the--envflag.
🛠️ Editor Autocomplete & JSON Schema
To make your development workflow fast and error-free, Gherkio includes a built-in JSON Schema generator (gherkio schema). This provides inline autocompletions, real-time syntax checking, and hover documentation inside editors like VSCode, Neovim, and others.
1. Generate the Autocomplete Schema
Generate the schema file in your project's workspace root:
gherkio schema > .gherkio-schema.json
💡 Zero-Install Alternative: If you do not have the binary installed on your local system path, you can run the generator dynamically using remote
go run:go run github.com/muhfaris/gherkio@v0.1.0-alpha.5 schema > .gherkio-schema.json
2. VS Code Integration
- Install the official YAML Extension by Red Hat inside VS Code.
- Open or create your workspace
settings.jsonfile under.vscode/settings.jsonand associate the schema with your Gherkio test folders:
{
  "yaml.schemas": {
    "./.gherkio-schema.json": [".gherkio/tests/**/*.yaml", ".gherkio/tests/**/*.yml"]
  }
}
3. Inline Alternative (Any Editor)
If you don't use VS Code or prefer localized configuration, add this directive comment as the very first line of your Gherkio YAML test files:
# yaml-language-server: $schema=../../.gherkio-schema.json
Tutorial: Build Your First Test
In this tutorial, you will write a complete Gherkio declarative integration test scenario from scratch.
We will build a multi-step user journey mimicking a content platform workflow:
- Fetch a post from an API endpoint.
- Assert the response status, check that the title is a non-empty string, and verify the post ID is correct.
- Save the
userIdfrom the post response. - Fetch the user's profile using the saved variable and assert their username matches.
🛠️ Step 1: Create Your Test File
First, navigate to your Gherkio test directory (created during gherkio init) and create a new YAML file:
touch .gherkio/tests/example/auth/my-first-test.yaml
Open this file in your favorite text editor.
📝 Step 2: Define Scenario Metadata
Every Gherkio test suite begins with a scenario declaration and optional tag lists for easy test suite filtering:
scenario: Fetch Post and Verify Author Profile
tags:
  - regression
  - tutorial
🔄 Step 3: Write the First Step (Fetch & Assert)
Let's append our first test step under the steps list. This step issues a standard HTTP GET request to fetch Post #1:
steps:
  - request:
      method: GET
      url: https://jsonplaceholder.typicode.com/posts/1
    expect:
      status: 200
      body.id: 1
      body.title: string
      body.userId: integer
💡 What's Happening Here?
request.method&request.url: Define the HTTP command and fully-qualified target path.expect.status: 200: Ensures the server replies with a200 OKstatus.expect.body.id: 1: Asserts exact equality. The post ID must be exactly1.expect.body.title: string: Evaluates the data type. Asserts that the title field returned is a string.expect.body.userId: integer: Ensures the author reference is a valid number.
💾 Step 4: Extract and Save Context Variables
Before fetching the user's profile, we need to know who wrote Post #1. We can extract the userId field dynamically and save it under a temporary variable name:
    save:
      authorId: body.userId
💡 What's Happening Here?
save: The context extractor block.authorId: body.userId: Resolves the JSON body fielduserId(e.g.1), and binds its value to the session variableauthorIdfor subsequent steps.
🔗 Step 5: Write the Second Step (Variable Reuse)
Now, let's add a second step to retrieve the profile of the author we just saved. We will interpolate the $authorId variable directly in the request URL:
  - request:
      method: GET
      url: https://jsonplaceholder.typicode.com/users/$authorId
    expect:
      status: 200
      body.id: integer
      body.username: string
💡 What's Happening Here?
url: .../users/$authorId: Gherkio automatically replaces$authorIdwith the value extracted in the previous step (e.g.https://jsonplaceholder.typicode.com/users/1).expect.body.username: string: Confirms that the profile contains a valid, non-empty username.
🚀 Step 6: Review the Full Scenario File
Here is what your completed .gherkio/tests/example/auth/my-first-test.yaml file should look like:
scenario: Fetch Post and Verify Author Profile
tags:
  - regression
  - tutorial

steps:
  - request:
      method: GET
      url: https://jsonplaceholder.typicode.com/posts/1
    expect:
      status: 200
      body.id: 1
      body.title: string
      body.userId: integer
    save:
      authorId: body.userId

  - request:
      method: GET
      url: https://jsonplaceholder.typicode.com/users/$authorId
    expect:
      status: 200
      body.id: integer
      body.username: string
🏃 Step 7: Run Your Test
Now run your new declarative scenario using the Gherkio CLI:
gherkio run example/auth/my-first-test.yaml --verbose
🎉 The Output
Gherkio will execute both steps sequentially, resolving variables on the fly, and outputting beautiful execution metrics:
✔ Step 1: GET https://jsonplaceholder.typicode.com/posts/1 [200 OK] (95ms)
  ✔ Assertion: status == 200
  ✔ Assertion: body.id == 1
  ✔ Assertion: body.title matches type string
  ✔ Assertion: body.userId matches type integer
  → Saved authorId: 1

✔ Step 2: GET https://jsonplaceholder.typicode.com/users/1 [200 OK] (87ms)
  ✔ Assertion: status == 200
  ✔ Assertion: body.id matches type integer
  ✔ Assertion: body.username matches type string

=======================================================
SCENARIO RESULT: PASSED
Total Steps: 2 | Passed: 2 | Failed: 0 | Duration: 182ms
=======================================================
You've successfully built, written, and verified your first multi-step integration test flow! Next, check out how to structure your custom local environment files to avoid hardcoding domain URLs under Folder & Project Setup.
Interactive Browser Playground
To lower Gherkio's learning curve to zero, the repository includes a self-contained, browser-based Interactive Playground and Documentation Hub located under docs/book/playground/index.html.
You can use the playground to experiment with test scenarios, visualize complex execution paths, and translate legacy commands in real-time.
🚀 How to Launch the Playground
Since the playground is a static, modern vanilla web application, you can run it instantly:
- Online Sandbox: Access the hosted web workspace directly on GitHub Pages Playground.
- Open via File Manager: Double-click docs/book/playground/index.html to launch it in your default web browser offline.
- Open via Terminal:
# Linux
xdg-open docs/book/playground/index.html

# macOS
open docs/book/playground/index.html
🛠️ Main Features
+-------------------------------------------------------------------+
|  [ Read Chapters ]      [ Visual DSL Stepper ]    [ cURL Convert ] |
+-------------------------------------------------------------------+
1. Visual DSL Stepper
- What it does: Type or edit Gherkio declarative YAML test steps on the left pane, and see a live graphical flowchart built on the right pane!
- Interactive Cards: Shows step-by-step HTTP methods (GET, POST, etc.), request URL routing, expected assertions, and saved context variables.
- Timeline Connectors: Displays step sequence borders with glowing accents.
2. cURL-to-YAML Step Translator
- What it does: Paste standard legacy cURL terminal logs (e.g., copied from Chrome Developer tools network inspector) and get back perfectly compiled Gherkio steps instantly.
- Features: Automatically extracts custom headers, handles multi-line request bodies, parses methods, and includes placeholder 200 expect blocks.
- Copy Target: Click "Copy" to drop the translated output straight into your
.gherkio/tests/files.
DSL Reference
Gherkio features a fully declarative, human-readable YAML Domain Specific Language (DSL). It eliminates the need to write boilerplates in Go, Python, or JavaScript to test your REST, GraphQL, or HTTP APIs.
🎨 Design Philosophy
Gherkio's DSL is built on several key tenets:
- Declarative, Not Imperative: State what you want to request and what you expect to receive, rather than how to parse, compare, or loop.
- AI-Native Compatibility: Structured as dense, well-defined YAML, making it exceptionally easy for Large Language Models (LLMs) to write, audit, and modify tests with 100% precision.
- Portability: Test suites can be executed inside any CI/CD pipeline, locally on a laptop, or loaded as resources into an AI agent workspace via MCP.
🏗️ Basic Scenario Structure
A test scenario file contains three lifecycle blocks: setup, steps, and teardown.
# Reusable tags to filter tests (e.g. gherkio run --tag smoke)
tags:
  - smoke
  - payments

# Step 1: Pre-conditions. If setup fails, main steps are skipped, but teardown still runs.
setup:
  - request:
      method: POST
      url: /setup-db
    expect:
      status: 200

# Step 2: Primary test steps executed sequentially.
steps:
  - request:
      method: GET
      url: /payments/methods
    expect:
      status: 200
      body.methods: array

# Step 3: Cleanup steps. Guaranteed to execute even if setup or steps fail.
teardown:
  - request:
      method: POST
      url: /teardown-db
Scenarios & Tags
Every Gherkio test file describes a single test scenario. The root of the YAML document contains the top-level keys for execution metadata, tagging, and execution phases.
🏗️ Top-Level Key Reference
All keys in the Gherkio DSL are case-sensitive and must be written in lowercase.
| Key | Type | Required | Description | Example |
|---|---|---|---|---|
scenario | string | Yes | Human-readable name of the test scenario | scenario: Create new user |
description | string | No | Detailed description of what this scenario tests. Shown in HTML report header | description: Verify user can login with valid credentials |
tags | array | No | List of categories/labels for execution filtering | tags: [smoke, active] |
setup | array | No | Pre-condition HTTP requests or composed files | (See Setup/Teardown chapter) |
steps | array | Yes | Primary sequence of API request and assertion steps | (See Steps chapter) |
teardown | array | No | Post-condition cleanup steps (guaranteed to run) | (See Setup/Teardown chapter) |
🏷️ Tagging & Filtering Conventions
Tags are strings that allow you to segment and filter test executions. They are extremely valuable for executing specific subsets of a test suite (e.g. running only light tests on commit, and full suites nightly).
scenario: Authenticated checkout flow
description: Verifies a logged-in user can add items to cart and complete checkout with valid payment.
tags:
  - e2e
  - checkout
  - high-priority
Filtering test runs from CLI:
# Run tests containing the 'smoke' tag
gherkio run tests/ --tag smoke

# Run tests containing BOTH 'core' AND 'user' tags (Logical AND)
gherkio run tests/ --tag core --tag user
Setup & Teardown
Managing database seeds, cleanups, and dynamic pre-conditions is critical for reliable integration tests. Gherkio provides native setup and teardown lifecycle blocks to isolate environment mutations.
🔁 Lifecycle Execution Path
Gherkio follows a strict execution guarantee for test scenarios:
                  ┌────────────────────┐
                  │   Start Scenario   │
                  └─────────┬──────────┘
                            │
                            ▼
                  ┌────────────────────┐
                  │ Execute SETUP Steps│
                  └─────────┬──────────┘
                            │
              ┌─────────────┴─────────────┐
              │                           │
      Success │                   Failure │
              ▼                           ▼
    ┌──────────────────┐        ┌──────────────────┐
    │   Execute Main   │        │    Skip Main     │
    │      STEPS       │        │      STEPS       │
    └─────────┬────────┘        └─────────┬────────┘
              │                           │
              └─────────────┬─────────────┘
                            │
                            ▼
                  ┌────────────────────┐
                  │  Execute TEARDOWN  │
                  │ Steps (Guaranteed) │
                  └─────────┬──────────┘
                            │
                            ▼
                  ┌────────────────────┐
                  │    End Scenario    │
                  └────────────────────┘
- Setup Failures: If any step in the
setupblock fails, Gherkio halts execution immediately, skips the primarystepsblock entirely (marking the scenario as failed), and jumps directly to theteardownblock. - Teardown Guarantees: The
teardownblock is guaranteed to run regardless of whether thesetupblock or the primarystepsblock succeeded or failed. This ensures database cleanups, session invalidations, or resource releases are always performed.
📝 Lifecycle Configuration Example
Here is a typical scenario writing a temporary resource, asserting against it, and then cleaning it up:
scenario: Manage User Profile
setup:
  - use: shared/authenticate.yaml   # Get auth token
  - request:
      method: POST
      url: /profiles
      headers:
        Authorization: "Bearer ${token}"
      body:
        username: "temp_user"
    save:
      profileId: body.id

steps:
  - request:
      method: GET
      url: /profiles/$profileId
      headers:
        Authorization: "Bearer ${token}"
    expect:
      status: 200
      body.username: temp_user

teardown:
  - request:
      method: DELETE
      url: /profiles/$profileId     # Clean up target profile
      headers:
        Authorization: "Bearer ${token}"
    expect:
      status: 200
Step Properties
Steps are the execution blocks inside Gherkio's setup, steps, and teardown lifecycle lists. They are evaluated sequentially, passing context variables, environment tokens, and parsed JSON fields down the scenario chain.
⚡ The Step Structure
A scenario step is defined as a YAML map containing structural blocks that configure the action, validate the response, extract variables, or control loops.
- name: Create checkout order        # Optional human-readable step label
  request:                       # 1. Action: Trigger HTTP request
    method: POST
    url: /v1/checkout
    timeout: 5s
  expect:                        # 2. Assert: Validate status & schema
    status: 201
    body.success: true
  save:                          # 3. Context: Store data for next steps
    orderId: body.id
  timing:                        # 4. Perform: Latency budget check
    max: 500ms
🧭 Step Configuration Properties
Each step in a scenario sequence supports the following top-level keys:
| Property Key | Type | Required | Description | Example |
|---|---|---|---|---|
name | string | No | Human-readable label for the step. Shown in test output and HTML report instead of METHOD /url. | name: Create new order |
request | object | Conditional | HTTP request payload block. Mutually exclusive with use. | (See Request Properties below) |
use | string | Conditional | Scenario composition. Imports and executes another scenario YAML file inline. | use: shared/login.yaml |
with | map[string]string | No | Variable overrides injected into a use: step. Values interpolated before injection; original values restored after completion. | with: { PARENT_CLAIM_ISSUE_ID: $STATUS_APPROVED_ID } |
expect | object | No | Assertions mapping target dot-notation paths to expected formats or matchers. | expect: { status: 200 } |
save | map[string]string | No | Context extraction map. Binds response parameters to dynamic variables. | save: { token: body.accessToken } |
retry | object | No | Automated polling loop rules for testing eventually consistent resources. | (See Retry & Polling chapter) |
timing | object | No | Latency budget validation. Asserts that request execution did not exceed duration limits. | timing: { max: 300ms } |
🌐 Request Configuration Properties (request)
The request block defines the HTTP action Gherkio will execute. It supports the following keys:
| Property Key | Type | Required | Description | Example |
|---|---|---|---|---|
method | string | Yes | HTTP request verb. Sourced as GET, POST, PUT, DELETE, PATCH, OPTIONS, HEAD. | method: POST |
url | string | Yes | Target URL. Supports relative paths (resolves to environment baseUrl) or absolute URLs. | url: /v1/users |
service | string | No | Routes the request to a specific microservice defined in the active environment. | service: auth |
headers | map[string]string | No | Key-value mapping of custom HTTP headers. Supports variable interpolation. | headers: { Content-Type: "application/json" } |
body | any | No | Request body payload. Supports JSON maps, lists, raw strings, and variable injection. | body: { role: "admin" } |
multipart | object | No | Multipart form-data wrapper used for sending form fields and binary file uploads. | (See Requests chapter) |
timeout | string | No | HTTP socket timeout limit (parsed via standard Go duration strings like 5s, 500ms, 1m). | timeout: 10s |
💾 Dynamic Variable Saving (save)
The save block allows steps to bind HTTP response parameters (body fields, headers, or decoded JWT claims) to variables that can be dynamically interpolated in all subsequent request URLs, headers, or bodies.
Syntax Reference
save:
  variable_name: response_source_path
body.<path>: Extracts JSON fields. Supports dotted-paths, indexes, and collections.- Example:
productId: body.items[0].id
- Example:
headers.<header-key>: Extracts HTTP response header values (case-insensitive).- Example:
rateLimit: headers.X-Rate-Limit
- Example:
jwt.<claim>: Automatically decodes response JWT keys (looks fortoken,accessToken,access_token) and extracts claims.- Example:
adminRole: jwt.role
- Example:
⏱️ Latency Budgets (timing)
In performance-critical applications, keeping endpoint response latency within a specific budget is a core contract. Gherkio allows developers to validate performance metrics directly inside test steps using the timing block:
Configuration Syntax
timing:
  max: duration_string # e.g. "200ms", "1s", "1.5s"
If the combined execution time of the step exceeds the max threshold, Gherkio fails the step and reports a detailed latency budget violation error:
❌ Step 2: GET /users/profile timing assertion failed
  - Expected latency: <= 200ms
  - Actual latency:   242ms
🔌 Scenario Composition & Context Bubble Up (use)
To keep test suites DRY, Gherkio steps can delegate execution to a shared modular test script using the use: tag.
Execution Blueprint
# Inside login-and-query.yaml
steps:
  - use: auth/login.yaml            # 1. Runs login sequence, saves $authToken
  - request:
      method: GET
      url: /profile
      headers:
        Authorization: "Bearer ${authToken}" # 2. Automatically inherits $authToken
- Monotonic Variables: Any variable saved (via
save) inside the composed YAML file is automatically merged and bubbles up to the parent execution context. - Context Inheritance: Composed scenarios inherit all variables defined prior to their execution (e.g. host environments, active credential credentials).
Request Configuration
The request block defines the outgoing HTTP request. Gherkio supports full-featured HTTP client configurations including custom verbs, header maps, service targeting, and flexible request body encodings.
🌐 HTTP Request Key Reference
| Key | Type | Required | Description | Example |
|---|---|---|---|---|
method | string | Yes | HTTP Method (GET, POST, PUT, DELETE, PATCH, OPTIONS, HEAD) | method: GET |
url | string | Yes | Target path (relative to baseUrl) or fully qualified absolute URL | url: /v1/profile |
query | map[string]string | No | Query parameters appended to the URL. Supports variable interpolation in values. | query: { status: available, limit: "10" } |
service | string | No | Target service key to override default baseUrl | service: payment |
headers | object | No | Map of custom key-value HTTP headers | headers: { Content-Type: application/json } |
body | any | No | Request payload. Can be JSON objects, lists, strings, or numbers | (See below) |
timeout | string | No | Request-specific HTTP timeout override | timeout: 45s |
🛠️ Detailed Usage & Examples
Targeting Specific Services
If your system uses a microservice architecture, map service endpoints in your environment file (e.g. environments/staging.yaml):
baseUrl: https://staging.host.com
services:
  users: https://users-staging.host.com
  billing: https://billing-staging.host.com
Invoke service routing in your YAML request:
steps:
  - request:
      service: users            # Resolves to https://users-staging.host.com/v1/profile
      method: GET
      url: /v1/profile
JSON Request Payload
JSON bodies are defined natively in Gherkio YAML and fully support runtime variable interpolation:
steps:
  - request:
      method: POST
      url: /register
      headers:
        Content-Type: application/json
      body:
        username: $randomEmail   # Interpolated using built-in generator
        profile:
          firstName: "John"
          lastName: "Doe"
          age: ${randomInt(18,65)}
Query Parameters (query)
Use the query block to append URL query parameters instead of embedding them directly in the URL string. This keeps URLs clean and allows variable interpolation for dynamic values:
steps:
  - request:
      method: GET
      url: /pets/findByStatus
      query:
        status: available
        limit: "10"
    expect:
      status: 200
Query parameter values support full variable interpolation:
steps:
  - request:
      method: GET
      url: /users
      query:
        role: $userRole
        page: "${randomInt(1,5)}"
    expect:
      status: 200
Multipart Form Data (multipart)
To test form-based submissions or file uploads, Gherkio features an elegant multipart block. When multipart is defined, Gherkio automatically builds the boundary formatting and sets the proper standard HTTP header (multipart/form-data; boundary=...) for you.
You can mix raw fields and multiple file attachments inside a single payload:
steps:
  - request:
      method: POST
      url: /v1/user/profile
      multipart:
        fields:
          username: "john_doe"
          role: $accounts.admin.role   # Support dynamic variables
        files:
          # 1. Simple path string syntax:
          avatar: "assets/john-avatar.png"

          # 2. Advanced schema mapping (with custom MIME types and filenames):
          document:
            path: "assets/resume.pdf"
            contentType: "application/pdf"
            filename: "john_doe_cv.pdf"
    expect:
      status: 200
      body.updated: true
💡 Key Details:
multipart.fields: A flat map of key-value string pairs representing text form fields.multipart.files: A map of files. The field key is the form property name (e.g.avatar).- File Resolution: Gherkio resolves relative file paths relative to your Gherkio project directory (
.gherkioparent directory). - MIME Detection: If using the simple string syntax, Gherkio automatically infers the
Content-Typeof the file from its file extension (e.g..png➔image/png). Use the advanced map syntax to specify overrides explicitly.
🔄 Declarative Collection Projections (transform)
Gherkio allows you to dynamically filter, slice, project, and reshape array collections from your saved variables directly into your request payload target path before the HTTP request is dispatched.
Transform Block Key Reference:
| Key | Type | Required | Description |
|---|---|---|---|
from | string | Yes | The source collection variable name (must start with $). |
as | string | No | Variable alias to represent each element context during transformation (defaults to "item"). |
where | object | No | Map of filters applying standard Gherkio matchers. |
limit | int | No | Maximum count of matching projected elements to output. |
select | object | Yes | Custom structural schema mapping. Supports recursive/nested projection maps. |
⚡ Explicit Type Casting inside Projections
When mapping data from target APIs to your request payloads, different endpoints might expect different types. Gherkio provides explicit type-casting functions inside the projection's select block:
$string(var): Converts a field to a string (e.g.,$string(item.id)turns1001to"1001").$int(var): Coerces/parses a field value into an integer.$float(var): Coerces/parses a field value into a float64.$bool(var): Coerces/parses truthy string or integer values into a boolean.
🌀 Conditional Value Selection ($if)
Values can vary conditionally using the $if(condition, thenValue, elseValue) function. This works inside transform select blocks and also directly in request body strings.
condition: A scoped variable path to evaluate for truthiness (e.g.item.is_answeredoris_active).thenValue: Value expression used when the condition is truthy.elseValue: Value expression used when the condition is falsy (optional — if omitted, evaluates tonull).
Truthiness rules: nil, false, 0, and "" are falsy; all other values are truthy.
Inside transform select (scoped to item alias):
select:
  # Map different fields based on question type
  answer_value: "$if(q.is_answered, q.free_text_answer, q.default_answer)"

  # Use type casting inside conditionals
  quantity: "$if(item.in_stock, $int(item.qty), 0)"

  # No else clause — returns null when condition is falsy
  optional_field: "$if(item.has_value, item.value)"
Inside request body (use $ prefix for variable references):
body:
  # Conditionally map based on a saved variable
  status: "$if(is_admin, $admin_endpoint, $user_endpoint)"

  # Use type casting with conditionals
  count: "$if(has_items, $int(item_count), 0)"
Complete Example:
steps:
  # Step 1: Fetch details
  - request:
      method: GET
      url: /surveys/132
    save:
      raw_questions: body.questions

  # Step 2: Reshape and submit survey answers
  - request:
      method: POST
      url: /surveys/132/submit
      body:
        survey_id: 132
      transform:
        # Dynamically inject the projected array under body.answers
        answers:
          from: $raw_questions
          as: q
          where:
            q.is_required: true
          limit: 10
          select:
            # Explicitly cast integer id from details response to string for submission!
            question_id: "$string(q.id)"

            # Coerce the sequence number to integer
            seq: "$int(q.seq)"

            # Static values and clean variable mapping
            is_answered: true
            free_text_answer: q.user_response
💡 Type Preservation & Explicit Casting in Standard Bodies
Outside of the transform projection block, Gherkio automatically preserves the original type of standalone variables mapped inside the HTTP request body:
- If you map a saved integer variable:
employee_id: $employee_id, Gherkio keeps the value as a JSON number (1234) in the outgoing request payload. - If you explicitly want to coerce it to a string (or other types), wrap the variable in a casting operator inside the request body:
body:
  emp_id: "$string(employee_id)"   # Outgoing payload: "emp_id": "1234"
  status: "$bool(is_active)"       # Outgoing payload: "status": true
Scenario Composition (use:)
Scenario Composition allows Gherkio tests to remain modular, reusable, and DRY (Don't Repeat Yourself). By using the use: property, a scenario can import and run another scenario file in-line as a single step.
⚡ Basic Usage
A common testing pattern is performing an authentication sequence before requesting resource endpoints. Instead of copy-pasting the authentication request in dozens of test files, define it once in a shared test:
Shared Auth Step: .gherkio/tests/shared/login.yaml
scenario: Authenticate Admin
steps:
  - request:
      method: POST
      url: /auth/login
      body:
        username: $accounts.admin.username
        password: $accounts.admin.password
    expect:
      status: 200
    save:
      adminToken: body.token
Main Scenario: .gherkio/tests/users/list.yaml
scenario: Retrieve User List
steps:
  - use: shared/login.yaml          # Executes the login scenario in-line

  - request:
      method: GET
      url: /users
      headers:
        Authorization: "Bearer ${adminToken}"   # Uses variable saved in the used scenario
    expect:
      status: 200
🔄 Composition in Setup, Steps, and Teardown
In Gherkio, the setup, steps, and teardown blocks are structurally identical lists of steps. Because of this elegant design, you can use use: composition in any phase of your scenario's lifecycle:
setup: Use composition to log in, seed initial databases, or construct pre-condition states.steps: Use composition to execute core nested business operations or user flows.teardown: Use composition to run post-condition cleanups, delete created test objects, or invalidate session tokens.
Comprehensive Lifecycle Composition Example:
scenario: Complete Order Cycle
setup:
  - use: shared/login.yaml               # Logs in and bubbles up $adminToken
  - use: shared/seed-inventory.yaml      # Seeds item database before run

steps:
  - request:
      method: POST
      url: /orders
      headers:
        Authorization: "Bearer ${adminToken}"
      body:
        itemId: 105
        quantity: 1
    expect:
      status: 201
    save:
      createdOrderId: body.orderId

teardown:
  - use: shared/clear-inventory.yaml     # Resets DB inventory back to baseline
🧭 File Resolution Logic
When Gherkio encounters a use: <path> step, it attempts to resolve the filepath in the following sequence:
- Relative Path: Relative to the directory containing the current test file.
- Workspace Root: Relative to the root
.gherkio/tests/directory. - Absolute Path: Absolute file paths on the local filesystem.
⚠️ Recursion & Composition Rules
To prevent infinite loops and ensure robust execution, Gherkio enforces strict structural and execution rules on all composed steps.
1. Request/Use Mutual Exclusion
A single step cannot define both use: and request:. They are strictly mutually exclusive:
- ❌ Illegal Step:
# Fails static analysis! - use: shared/login.yaml request: method: GET url: /profile - ➔ Correct Structure:
- use: shared/login.yaml
- request:
    method: GET
    url: /profile
2. Forbidden Retry Blocks on Composed Steps
You cannot apply a retry: block to a use: step. Retries are only allowed on individual HTTP requests, not entire composed scenarios. If you define a retry block on a composed step, Gherkio halts immediately with a validation error.
- ❌ Illegal Step:
# Fails validation! - use: shared/login.yaml retry: attempts: 3 backoff: 1s - ➔ Correct Structure: Apply the retry block inside the shared
login.yamlstep definition directly.
3. Nesting & Recursion Limits
To protect runner performance and prevent system freezes:
- Default Composition Depth: Nesting is limited to a maximum depth of 5 nested layers by default (customizable in your
config.yamlusing themaxCompositionDepthproperty). - Strict Cutoff Limit: Regardless of configurations, Gherkio enforces a hard ceiling at 10 nested layers. Exceeding this triggers a static error (
circular reference or max depth exceeded). - Circular Import Checks: Gherkio builds an import dependency graph prior to execution. If a circular loop is found (e.g.
A.yaml➔B.yaml➔A.yaml), the executor aborts before making any HTTP requests.
4. Context Inheritance & Variables Bubbling
- Any dynamic variables or state captured (via the
savekeyword) inside a composed scenario are automatically merged and bubbled up into the parent scenario's execution context. - Once a composed step finishes executing, all subsequent steps in the parent file have full access to its saved variables.
↔ Variable Overrides (with:)
Sometimes you need to pass a value into a composed scenario, rather than just consuming values that bubble out. The with: block lets you inject temporary variables into the used scenario's context:
- use: shared/lookup/status_claim.yaml
  with:
    PARENT_CLAIM_ISSUE_ID: $STATUS_APPROVED_ID
How it works
- Each key in
with:is interpolated against the current execution context before injection. - The resolved values are injected as local variables into the used scenario for the duration of its execution.
- After the
use:step completes, the previous values are restored — the override doesn't leak to subsequent steps.
Real-world example
scenario: check claim status after approval

setup:
  - request:
      method: POST
      url: /auth/login
      body:
        username: $accounts.default.username
        password: $accounts.default.password
    expect:
      status: 200
    save:
      STATUS_APPROVED_ID: body.approvedStatusId

steps:
  # Pass the approved status ID into a shared lookup scenario
  - use: shared/lookup/status_claim.yaml
    with:
      PARENT_CLAIM_ISSUE_ID: $STATUS_APPROVED_ID

  - request:
      method: GET
      url: /claims/$CLAIM_ID
      headers:
        Authorization: "Bearer ${adminToken}"
    expect:
      status: 200
      body.status: Approved
Notes
with:is only valid onuse:steps. It cannot be combined withrequest:.- Values support full variable interpolation (
$var,${var:default},$accounts.<name>.<field>, built-in generators, etc.). - Overrides take precedence over any variables with the same name from the parent context, but only inside the used scenario.
Assertions & Dot-Paths
Assertions are the core validation engine of Gherkio. Placed inside the expect block of any step, assertions inspect, type-check, and validate the returned HTTP response status, headers, body structure, and even embedded JWT tokens.
🏗️ The Anatomy of expect
The expect block defines a set of strict contracts that the HTTP response must satisfy. Gherkio evaluates these assertions sequentially upon request completion.
⚡ Fail-Fast Execution
Gherkio implements a strict fail-fast design.
- Assertions are checked in the order they are written.
- If any single assertion fails, step execution is immediately aborted, the entire scenario is marked as failed, and any subsequent steps (such as database queries or follow-up requests) are skipped.
- This prevents cascading failures, reduces network bandwidth waste, and keeps your test reports clean and focused on the root cause.
🧭 Dot-Path Prefixes & Resolvers
Gherkio uses a declarative dot-notation system to target specific parts of the response. The prefix of the path determines which resolver is invoked:
| Path Prefix | Target Component | Key Case-Sensitivity | Purpose | Example |
|---|---|---|---|---|
status | HTTP Status Code | N/A | Validates the exact status code | status: 200 |
body.<path> | JSON Response Body | Case-Sensitive | Traverses response JSON structures | body.user.email: email |
headers.<key> | HTTP Response Headers | Case-Insensitive | Inspects response headers | headers.content-type: contains json |
jwt.<claim> | Decoded JWT payload | Case-Sensitive | Automatically decodes tokens and inspects claims | jwt.role: admin |
schema | JSON Schema Contract | N/A | Enforces a full JSON schema contract | schema: users/create |
timing.duration | Round-trip request time | N/A | Asserts latency SLA/performance | timing.duration: lte 500ms |
1. Response Body Traversal (body.<path>)
The body. prefix targets the response body payload (expected to be JSON). Gherkio traverses nested properties, list indices, and dictionary keys.
Key Syntax Features:
- Nested Navigation: Use dots to descend into maps (e.g.,
body.user.profile.firstName). - Array Indexing: Use brackets to access specific list items (e.g.,
body.items[0].id). - Case Sensitivity: JSON keys are strictly case-sensitive.
body.userIdis different frombody.userid.
💡 Intelligent Spelling Suggestion Engine
If you write an assertion for a path that does not exist in the response payload, Gherkio's smart diff engine doesn't just fail; it analyzes the keys that were actually present in the response and prints helpful spelling suggestions in your terminal:
✗ timing.duration = lte 500ms (actual: 312ms)
✗ body.accessToken = exists
  Reason: field 'accessToken' not found in response body
  Suggestions:
    - message
    - statusCode
2. HTTP Headers (headers.<key>)
The headers. prefix allows you to inspect HTTP response headers.
Key Syntax Features:
- Case-Insensitivity: In accordance with the HTTP RFC, header lookups are fully case-insensitive. Gherkio normalizes these keys internally, meaning
headers.content-type,headers.Content-Type, andheaders.CONTENT-TYPEare completely equivalent. - Multi-Value Headers: If a header has multiple values, Gherkio normalizes them to a single comma-separated string for easy assertion matching (e.g.
headers.cache-control: contains no-cache).
3. Automatic JWT Claim Decoding (jwt.<claim>)
One of Gherkio's most powerful native features is the automatic discovery and decoding of JSON Web Tokens.
How It Works:
- When a request completes, Gherkio scans the response body for standard JWT field names:
tokenaccessTokenaccess_tokenidTokenid_token
- If any of these fields are present and contain a valid base64-encoded, three-part JWT structure (
header.payload.signature), Gherkio automatically decodes the payload section into memory. - You can assert directly against claims in the payload using the
jwt.prefix.
Example:
If the server returns:
{
  "accessToken": "eyJhbGciOiJIUzI1NiIsInR5cCI6IkpXVCJ9.eyJzdWIiOiIxMjMiLCJyb2xlIjoiYWRtaW4iLCJleHAiOjE3MTY4ODQwMDB9.sig"
}
You can immediately assert:
expect:
  jwt.sub: "123"
  jwt.role: "admin"
  jwt.exp: datetime  # Asserts that the expiration claim is present
4. JSON Schema Contracts (schema)
For absolute validation of deep objects and API payloads, individual key assertions can become unwieldy. The schema directive enforces full, deep-object JSON Schema validation.
Syntax:
expect:
  schema: path/to/schema
How It Works:
- Path Resolution: Gherkio looks for the schema file under your project's configured schemas directory (usually
.gherkio/schemas/). It automatically appends.yaml,.yml, or.jsonto locate the file (e.g.,schema: users/profileresolves to.gherkio/schemas/users/profile.yaml). - Negation (
not): You can assert that a response does not match a schema by prefixing the value withnot(e.g.schema: not errors/validation). This is ideal for testing error states where a validation error structure should not be returned.
5. Response Timing Assertions (timing.duration)
To enforce service-level agreements (SLAs) or target performance constraints, Gherkio includes a native latency-checking resolver:
- Syntax:
timing.duration: <comparison-matcher> <duration> - Allowed Matchers: Supports comparison matchers like
lte,lt,gte, andgt. - Duration Syntax: A numeric value followed by
ms(milliseconds) ors(seconds).
expect:
  status: 200
  timing.duration: lte 500ms   # Step fails if request takes longer than 500ms
🔄 Dynamic Variables in Assertions
To avoid hardcoding values and to support end-to-end testing, Gherkio supports dynamic variable lookup directly in your assertion values.
1. Interpolating Saved & Global Variables ($<variable>)
Expected values inside the expect block are fully evaluated through the variable interpolation engine. This includes:
- Saved Variables: Values extracted from previous steps using the
saveblock (e.g.$userId). - Environment & Credentials Variables: Values loaded from the current environment YAML or credentials accounts (e.g.
$accounts.admin.email).
steps:
  - request:
      method: POST
      url: /v1/users
      body:
        email: "bob@example.com"
    save:
      newUserId: body.id

  - request:
      method: GET
      url: /v1/users/$newUserId
    expect:
      status: 200
      # Validates that the returned ID matches the ID saved from the previous step
      body.id: $newUserId
      # Validates against a global test account email from your environment config
      body.invitedBy: $accounts.admin.email
2. Current Request References (request.body.<field>)
When verifying creation or update steps, you often want to assert that the response body contains the exact same data sent in the request. You can refer to the current request's body fields dynamically using the request.body. prefix.
steps:
  - request:
      method: POST
      url: /v1/products
      body:
        title: "Mechanical Keyboard"
        price: 99.99
    expect:
      status: 201
      # Asserts that the response payload echoes back the sent request fields dynamically
      body.data.title: request.body.title
      body.data.price: request.body.price
🗄️ Collection & Array Assertions
Gherkio provides advanced built-in collection resolvers to perform validations across lists without writing loops.
1. Array Size Validation (count(<array-path>))
Asserts the exact length of a list returned in the response.
- Exact Count:
count(body.items): 5 - Comparators: Append
.gt,.gte,.lt, or.ltesuffixes to the path to perform numeric bounds checks:count(body.items).gte: 1— Asserts that the array is not empty (has at least 1 item).count(body.items).lt: 10— Asserts that the array contains fewer than 10 items.
[!NOTE] Unlike standard body paths,
count()paths resolve directly against the parsed response body root. Thebody.prefix inside the parenthesis is optional, but supported.
2. Universal Collection Asserts (all(<array-path>))
Asserts that every single element in a list satisfies a specific condition.
- Equality Check:
all(body.items.status): active— Asserts that every item in theitemslist has astatusequal to"active". - Matcher Assertion:
all(body.items.price): number— Asserts that every item in theitemslist has apricefield that is a number.
🌟 Comprehensive Real-World Example
Below is a complete, production-grade Gherkio test step demonstrating status codes, headers, nested body lookups, collection checks, automatic JWT assertions, and schema contract verification running side-by-side:
scenario: Complete API contract and session validation
steps:
  - request:
      method: POST
      url: /v1/auth/session
      body:
        username: "admin"
        device: "laptop"
    expect:
      # 1. Enforce exact HTTP status code
      status: 201

      # 2. Case-insensitive header checks
      headers.Content-Type: contains json
      headers.x-transaction-id: exists

      # 3. Deep-path JSON body validations using matchers & dynamic variables
      body.session.id: uuid
      body.session.metadata.device: request.body.device     # Dynamic reference to current request payload
      body.session.metadata.tenant: $tenantId               # Interpolates variable saved from previous steps
      body.session.active: true

      # 4. Collection checks with comparison bounds
      count(body.session.permissions).gte: 3
      all(body.session.permissions): string

      # 5. Automatic JWT discovery and claims validation
      jwt.role: "administrator"
      jwt.sub: uuid

      # 6. Full API schema validation (located at .gherkio/schemas/auth/session-response.yaml)
      schema: auth/session-response
Matcher Library
Gherkio includes a powerful, built-in library of 25+ assertion matchers. These matchers allow you to perform rich semantic validations—ranging from format verification (like UUIDs, email addresses, and datetimes) to mathematical range boundaries, string manipulations, and collection inspection—without writing any code or custom assertions.
📚 Complete Matcher Quick-Reference
| Keyword | Example | Target Data Must Be... |
|---|---|---|
| Existence | ||
exists | body.id: exists | Present in the payload and not null. |
not exists | body.deletedAt: not exists | Completely absent from the payload. |
| Type Verification | ||
string | body.name: string | A JSON string. |
number | body.price: number | Any integer or decimal/float value. |
boolean | body.active: boolean | A boolean value (true or false). |
array | body.tags: array | A JSON array list. |
object | body.metadata: object | A JSON object map. |
null | body.archivedAt: null | Strictly a JSON null. |
true | body.completed: true | Strictly boolean true. |
false | body.pending: false | Strictly boolean false. |
| String Operations | ||
contains <value> | body.msg: contains Success | A string containing the exact <value>. |
startsWith <val> | body.sku: startsWith LAP- | A string starting with prefix <val>. |
endsWith <val> | body.email: endsWith .com | A string ending with suffix <val>. |
regex <pattern> | body.code: regex ^[A-Z]{3}$ | A string matching the Go regular expression. |
| Numeric Bounds | ||
gt <value> | body.rating: gt 4 | Greater than <value>. |
gte <value> | body.price: gte 9.99 | Greater than or equal to <value>. |
lt <value> | body.age: lt 18 | Less than <value>. |
lte <value> | body.limit: lte 100 | Less than or equal to <value>. |
| Format Validators | ||
uuid | body.id: uuid | A valid UUID v4 format string. |
email | body.email: email | A valid RFC-compliant email address. |
datetime | body.createdAt: datetime | A valid RFC3339 / ISO8601 datetime string. |
uri | body.url: uri | A valid absolute URI string. |
ipv4 | body.ip: ipv4 | A valid IPv4 address (e.g. 192.168.1.1). |
ipv6 | body.ip: ipv6 | A valid IPv6 address (supports compressed). |
base64 | body.data: base64 | A valid Base64 or URL-Safe Base64 string. |
mac | body.address: mac | A valid MAC address format. |
| State Inspection | ||
empty | body.items: empty | An empty string "", empty list [], empty map {}, or null. |
🔍 Category Deep-Dive & Syntax Examples
1. Existence Checkers
These matchers verify whether a key is present or absent in the response payload structure.
exists: Evaluates to true if the field is present, regardless of its value (including empty values).not exists: Evaluates to true only if the key is completely omitted from the JSON payload.
expect:
  body.id: exists
  body.deletedAt: not exists
2. Type Enforcers & Booleans
Ensures response elements conform strictly to expected JSON data types.
string: Fails if the value is a number, boolean, array, or object.number: Validates integers, floats, and scientific JSON numbers.boolean: Matches eithertrueorfalsebooleans.array: Verifies the field is a JSON list.object: Verifies the field is a structured map/object.null: Verifies the value isnull.true/false: Value-specific boolean enforcers.
expect:
  body.profile.bio: string
  body.profile.age: number
  body.profile.isVerified: boolean
  body.tags: array
  body.preferences: object
  body.finished: true
  body.error: null
3. String Operations (Argument-based)
Performs text assertions on target string fields.
contains <value>: Checks if the target string contains the substring<value>(case-sensitive).startsWith <value>: Checks if the target string begins with the prefix<value>.endsWith <value>: Checks if the target string ends with the suffix<value>.regex <pattern>: Matches the string against a standard Go regular expression.
expect:
  body.description: contains Mechanical
  body.sku: startsWith KBD-
  body.supportEmail: endsWith @example.com
  body.productCode: regex ^[A-Z]{3}-\d{4}$
4. Mathematical Bounds (Argument-based)
Used to enforce numeric restrictions. Gherkio automatically coerces both the target response field and the matcher argument into float64 floating points for maximum comparison precision.
gt <value>: Greater than (>).gte <value>: Greater than or equal to (>=).lt <value>: Less than (<).lte <value>: Less than or equal to (<=).
expect:
  body.rating: gt 4.2
  body.stock: gte 0
  body.discount: lt 1.0
  body.itemsCount: lte 100
5. Format & Protocol Validators
Performs regex-based and parser-based syntax verification on strings to enforce RFC protocols.
uuid: Asserts strict compliance with UUID v4 syntax.email: Validates structural email address syntax (presence of@, valid domain blocks).datetime: Parses string against standard RFC3339 / ISO8601 structures (e.g.2026-05-29T10:12:15Z).uri: Verifies that the string is a valid absolute URI.ipv4/ipv6: Enforces valid IP structures, ensuring IPv4 segments fall between0-255and IPv6 fields support compressed forms.base64: Attempts standard base64 decoding and falls back to URL-safe raw base64 to ensure absolute compatibility.mac: Validates standard colon-separated or hyphen-separated MAC addresses (e.g.,00:1a:2b:3c:4d:5e).
expect:
  body.userId: uuid
  body.contactEmail: email
  body.createdAt: datetime
  body.imageLink: uri
  body.serverIp: ipv4
  body.payloadHash: base64
  body.deviceMac: mac
6. Emptiness Checker
The empty matcher is a unified helper designed to handle collections, strings, and missing records consistently:
- Returns
trueif target is a string equal to"". - Returns
trueif target is a JSON list containing0items. - Returns
trueif target is a JSON object map containing0properties. - Returns
trueif target isnull.
expect:
  # Validates that list is empty
  body.items: empty
  # Validates that custom message string is blank
  body.alertMessage: empty
🔄 Matchers inside Universal Collections (all)
Matchers are fully integrated into Gherkio's collection engine. When performing assertions on arrays, you can pass any matcher keyword as the target check inside an all() block:
expect:
  # Enforces that every element in the permissions array is a valid UUID
  all(body.users.id): uuid

  # Enforces that every transaction amount is positive
  all(body.transactions.amount): gt 0

  # Enforces that every tags list is a valid array
  all(body.products.tags): array
Schema Validation
Gherkio supports robust custom validation schemas. This allows you to enforce schema contracts for complex JSON APIs rather than writing dozens of line-by-line field assertions.
📐 Schema Definitions Directory
All validation schemas live under .gherkio/schemas/ and are defined using standard YAML or JSON files.
Gherkio resolves referenced schemas relative to the .gherkio/schemas/ directory. For example, referencing users/profile matches:
.gherkio/schemas/users/profile.yaml(or.yml).gherkio/schemas/users/profile.json
⚡ Asserting a Schema in DSL
To validate that an API response matches your contract, reference the schema file relative to .gherkio/schemas/ inside the expect block:
steps:
  - request:
      method: GET
      url: /profile
    expect:
      status: 200
      schema: users/profile         # Matches users/profile.yaml or users/profile.json
If the API response structure changes or omits a required field, Gherkio will output a clear error path highlighting precisely what failed the contract validation:
❌ Step 1: GET /profile failed schema validation
  - body.id: Does not match pattern
  - body.email: Required field is missing
⚙️ Supported Schema Constraints Reference
Gherkio's schema engine is highly optimized and supports standard JSON Schema-like validation keywords. Below is the complete reference of all supported properties.
1. Structural & Core Keywords
| Keyword | Type | Description |
|---|---|---|
type | string | Defines the expected data type. Allowed types: object, array, string, number, integer, boolean, null. |
nullable | boolean | If set to true, the value is allowed to be null even if other type rules are violated. Defaults to false. |
enum | array | A list of allowed values. The actual value must match one of the items exactly. |
2. Object Constraints
| Keyword | Type | Description |
|---|---|---|
properties | object | A map of nested key-value schemas defining the structure of object fields. |
required | array | A list of mandatory property keys that must exist and cannot be null. |
3. Array Constraints
| Keyword | Type | Description |
|---|---|---|
items | schema | The validation schema applied to every item inside the array. |
minItems | integer | Enforces the minimum number of items allowed in the array. |
maxItems | integer | Enforces the maximum number of items allowed in the array. |
4. String Constraints
| Keyword | Type | Description |
|---|---|---|
pattern | string | A standard Go-compliant regular expression pattern that the string must match. |
minLength | integer | The minimum length (number of characters) required for the string. |
maxLength | integer | The maximum length (number of characters) allowed for the string. |
format | string | Pre-defined specialized string format matches. Supported formats are: |
➔ email: Standard email format validation.➔ uuid: Standard UUID v4 format validation.➔ datetime: Valid RFC 3339/ISO 8601 timestamp formats.➔ uri: Valid absolute URI/URL pathway validation. |
5. Numeric Constraints (Numbers & Integers)
| Keyword | Type | Description |
|---|---|---|
minimum | number | Enforces that the numeric value is greater than or equal to this limit. |
maximum | number | Enforces that the numeric value is less than or equal to this limit. |
💡 Complete Schema Validation Examples
Example A: Comprehensive Array Schema (.gherkio/schemas/posts/list.yaml)
Enforces custom length limits, strict nullable attributes, item structure, and format matching for a list of blog posts.
type: array
minItems: 1
maxItems: 50
items:
  type: object
  required:
    - id
    - title
    - views
    - tags
  properties:
    id:
      type: string
      format: uuid
    title:
      type: string
      minLength: 3
      maxLength: 100
    description:
      type: string
      nullable: true           # Description can be null or a string
    views:
      type: integer
      minimum: 0
    tags:
      type: array
      minItems: 1
      items:
        type: string
        pattern: "^[a-z0-9-]+$" # Tags must be lowercase alphanumeric-kebab
Example B: Nested Object Schema (.gherkio/schemas/users/auth.yaml)
Validates a standard login response structure.
type: object
required:
  - user
  - token
properties:
  token:
    type: string
    minLength: 32
  user:
    type: object
    required:
      - id
      - email
      - role
    properties:
      id:
        type: string
        format: uuid
      email:
        type: string
        format: email
      role:
        type: string
        enum:
          - admin
          - user
          - editor
Editor Autocomplete Schema
Gherkio ships a machine-readable JSON Schema that editors like VS Code and Neovim can use to provide inline autocomplete, real-time validation, and hover documentation when writing Gherkio YAML test files.
🎯 What Is This?
When you open a Gherkio test file (e.g. .gherkio/tests/login.yaml) in a compatible editor, the JSON Schema tells the editor:
- Which top-level keys are valid (
scenario,setup,steps,teardown, etc.) - What types each field expects (
string,array,object, etc.) - Which keys are required in each block
- What values are allowed for enum-like fields (HTTP methods, matcher names, etc.)
- Descriptive comments shown as hover tooltips
This is powered by the gherkio schema CLI command, which introspects the Go model structs and emits a standard JSON Schema Draft-07 document.
🏗️ Schema Types
The gherkio schema command generates schemas for all first-class Gherkio file types. You can generate all of them at once, or target a specific type:
| Type | File Pattern | Description |
|---|---|---|
test | .gherkio/tests/**/*.yaml | Full scenario test files (setup + steps + teardown) |
config | .gherkio/config.yaml | Workspace configuration |
environment | .gherkio/environments/*.yaml | Environment definitions (baseUrl, services) |
credentials | .gherkio/credentials/*.yaml | Account credentials per environment |
schema-definition | .gherkio/schemas/**/*.yaml | JSON Schema Draft-07 contract files used in expect.schema assertions |
📦 Generating the Schema
Generate all schemas at once
gherkio schema > .gherkio-schema.json
This produces a single JSON file keyed by type:
{
  "test": { "$schema": "http://json-schema.org/draft-07/schema#", ... },
  "config": { ... },
  "environment": { ... },
  "credentials": { ... },
  "schema-definition": { ... }
}
Generate a specific schema type
gherkio schema --type test > gherkio-test-schema.json
gherkio schema --type environment > gherkio-env-schema.json
List available schema types
gherkio schema --list
🖥️ VS Code Integration
1. Install the YAML extension
Install the official YAML Language Server (Red Hat) extension in VS Code.
2. Configure schema associations
Open or create .vscode/settings.json in your workspace root:
{
  "yaml.schemas": {
    "./.gherkio-schema.json": [".gherkio/tests/**/*.yaml", ".gherkio/tests/**/*.yml"]
  }
}
3. Per-file schema directive (alternative)
Add this comment as the very first line of any Gherkio YAML file to use a locally generated schema:
# yaml-language-server: $schema=../../.gherkio-schema.json
scenario: Login flow
steps:
  ...
⚡ Neovim Integration
gherkio.nvim (recommended)
The official gherkio.nvim Neovim plugin automatically downloads and caches the schema from the MCP server (gherkio://dsl/schema.json) on first use. No manual configuration required.
For manual schema configuration in Neovim, point your YAML LSP or vim.schema settings to the generated schema file:
-- Example: vim.schema (Neovim 0.10+)
vim.schema('.gherkio-schema.json', {
  filepattern = '.gherkio/tests/**/*.yaml',
})
Or configure via yaml.schemas in vim.lsp.config if using yaml-language-server manually.
📁 Where to Place the Schema File
Place the generated .gherkio-schema.json in your workspace root (same level as .gherkio/):
.
├── .gherkio/
│   ├── tests/
│   │   └── login.yaml
│   ├── environments/
│   │   └── staging.yaml
│   └── schemas/
│       └── auth/token.yaml
└── .gherkio-schema.json    ← generated here
Commit .gherkio-schema.json to version control so every teammate gets autocomplete without running any commands.
🔄 Keeping the Schema Up to Date
The schema is derived from the Go model structs in the gherkio binary. After upgrading gherkio to a new version, re-generate the schema:
gherkio schema > .gherkio-schema.json
The MCP server always exposes the schema for the currently running binary version via the gherkio://dsl/schema.json resource URI.
📋 Schema Structure Overview
Below is a simplified view of the top-level structure the test schema validates:
# Top-level keys (all optional except 'steps')
tags:           []string          # Filter tags for selective runs
setup:          []Step            # Pre-condition block; halts on failure
steps:          []Step            # Primary test block (required)
teardown:       []Step            # Cleanup block; always executes

# Each Step is either a 'use' (composition) or a 'request':
Step:
  name:     string               # Human-readable label
  use:      string               # Path to another scenario file (mutually exclusive with request)
  request:  Request              # HTTP request config (mutually exclusive with use)
  expect:   Expect               # Response assertions
  save:     map[string]string    # Extract variables from response
  timing:   TimingConfig        # Latency budget

# Request fields
Request:
  service:  string               # Named service override
  method:   string               # GET|POST|PUT|PATCH|DELETE|HEAD|OPTIONS
  url:      string               # URL path (appends to baseUrl)
  query:    map[string]string    # Query parameters
  headers:  map[string]string    # Custom headers
  body:     any                  # Request payload
  transform: map[string]ProjectionConfig  # Declarative array projections

# Expect fields
Expect:
  status:          integer       # Expected HTTP status code
  body.<path>:     MatcherValue  # Body dot-path assertions
  headers.<name>:  MatcherValue  # Header assertions
  jwt.<claim>:     MatcherValue  # JWT claim assertions
  schema:          string        # Schema contract name (from .gherkio/schemas/)
  timing.duration: MatcherValue  # Latency assertion
For the full schema with all enum values, type constraints, and descriptions, run:
gherkio schema --type test | python3 -m json.tool | less
Variables & Generators
Variables allow you to pass state dynamically, randomize inputs, and secure secrets without hardcoding values in test scenarios. Gherkio evaluates and injects variables dynamically per step.
⚡ Declaring & Using Variables
Variables are prefixed with $ (e.g., $accessToken).
For string boundary isolation inside header fields or request bodies, wrap them in curly braces:
Authorization: "Bearer ${accessToken}"
Default Fallbacks
If a variable might not be defined under the current context, you can specify a default fallback:
role: "${role:user}"➔ resolves to the value of$roleif defined, otherwise defaults to"user".
🎲 Built-in Single-Value Generators
Gherkio dynamically generates fresh values once per step for these standard single-value variables:
| Variable | Output Type | Example Output | Description |
|---|---|---|---|
$uuid | string | a1b2c3d4-e5f6-4789-abcd-ef1234567890 | Valid UUID v4 string |
$ulid | string | 01ARZ3NDEKTSV4RRFFQ69G5FAV | Monotonically increasing ULID |
$randomInt | integer | 482910 | Random integer between 0 and 999999 |
$randomEmail | string | user_182938@example.com | Random email address with a numeric suffix |
$randomPhone | string | +6281234567890 | Random Indonesian format phone number (default fallback) |
🛠️ Dynamic Generator Functions
For more specialized payloads, Gherkio provides a collection of parameterized generator functions. These are declared using the ${functionName(args)} syntax.
1. Numeric & String Randomizers
${randomInt(min, max)}: Generates a random integer within a custom inclusive range.- Example:
${randomInt(1, 100)}➔42
- Example:
${randomString(length, charset)}: Generates a random string of a specified length using a selected character set (alpha,numeric,alphanumeric).- Example:
${randomString(12, "alphanumeric")}➔a8F2k9Pq3xLm
- Example:
${randomPhone(countryOrPrefix)}: Generates a random phone number based on a country code or a raw dialing prefix.- Country Codes: Supports mapping major ISO countries to standard mobile layouts. Valid codes include:
ID(Indonesia):+628...US/CA(USA / Canada):+1...GB/UK(United Kingdom):+447...SG(Singapore):+658...JP(Japan):+8190...DE(Germany):+491...FR(France):+336...AU(Australia):+614...IN(India):+919...CN(China):+861...BR(Brazil):+55119...RU(Russia):+79...ZA(South Africa):+277...KR(South Korea):+8210...NL(Netherlands):+316...ES(Spain):+346...IT(Italy):+393...MY(Malaysia):+601...PH(Philippines):+639...TH(Thailand):+668...VN(Vietnam):+849...
- Raw Dialing Prefix: You can pass any standard dialing prefix directly (e.g.
+351or351). Gherkio automatically ensures it has the+prefix and appends 9 random digits. - Default Fallback: Empty/unrecognized inputs automatically fallback to the Indonesian mobile (
ID) format. - Example (ISO Code):
${randomPhone("SG")}➔+658591823 - Example (Raw Prefix):
${randomPhone("+351")}➔+351982738192
- Country Codes: Supports mapping major ISO countries to standard mobile layouts. Valid codes include:
2. Time & Date Offset Functions
${timestamp()}: Returns the current Unix timestamp (seconds since epoch) as a string.- Example:
${timestamp()}➔1779958329
- Example:
${timestampMs()}: Returns the current Unix timestamp in milliseconds.- Example:
${timestampMs()}➔1779958329000
- Example:
${dateNow(format)}: Formats the current time using a custom layout. Defaults to Go layout2006-01-02 15:04:05.- Example:
${dateNow("2006-01-02")}➔2026-05-29
- Example:
${dateOffset(offset, format)}: Offsets the current date/time by days (d), hours (h), minutes (m), or seconds (s). Theformatargument is optional (defaults to2006-01-02).- Example (14 days forward):
${dateOffset("+14d")}➔2026-06-12 - Example (2 hours back):
${dateOffset("-2h", "2006-01-02 15:04:05")}➔2026-05-29 12:30:15
- Example (14 days forward):
[!IMPORTANT] Understanding Go's Date/Time Layouts
Gherkio uses Go's native reference-time formatting under the hood instead of traditional C-style
strftimepatterns (such as%Y-%m-%d).To define a layout, use values from Go's canonical reference date:
January 2, 2006 at 3:04:05 PM MST(representing components1 2 3 4 5 6 -0700).
Desired Format Go Layout Pattern Example Output ISO 8601 / RFC 3339 2006-01-02T15:04:05Z07:002026-05-29T17:24:14ZYYYY-MM-DD 2006-01-022026-05-29DD/MM/YYYY 02/01/200629/05/2026MM-DD-YYYY 01-02-200605-29-202624-Hour Time 15:04:0517:24:1412-Hour Time AM/PM 03:04:05 PM05:24:14 PMFull Month & Day January 2, 2006May 29, 2026Short Month & Year Jan 02, 06May 29, 26⚠️ Warning: Traditional formats like
%Y-%m-%doryyyy-MM-ddare not parsed and will be returned as literal strings (e.g.%Y-%m-%d). Only use the reference date numbers above.
🛠️ Creating Custom Layouts
You are not limited to the presets above! You can construct any custom date/time format by mixing your preferred punctuation (such as slashes
/, dots., hyphens-, colons:, or spaces) with Go's reference date tokens:
- Slash Separated:
${dateNow("2006/01/02")}➔2026/05/29- Dotted Format:
${dateNow("02.01.2006")}➔29.05.2026- Millisecond Precision:
${dateNow("15:04:05.000")}➔17:28:04.921- Written Sentence:
${dateNow("Monday, Jan 2, 2006")}➔Friday, May 29, 2026
3. Encoders & Text Formatters
${base64(data)}: Encodes the given string parameter to Base64.- Example:
${base64("hello")}➔aGVsbG8=
- Example:
${base64Decode(encoded)}: Decodes a Base64 string.- Example:
${base64Decode("aGVsbG8=")}➔"hello"
- Example:
${urlencode(data)}: Escapes special characters for use in URI query parameters.- Example:
${urlencode("hello world!")}➔hello+world%21
- Example:
${urldecode(encoded)}: Unescapes URL characters.- Example:
${urldecode("hello+world%21")}➔"hello world!"
- Example:
${toUpper(text)}: Converts the string to uppercase.- Example:
${toUpper("admin")}➔"ADMIN"
- Example:
${toLower(text)}: Converts the string to lowercase.- Example:
${toLower("TOKEN")}➔"token"
- Example:
${trim(text)}: Trims leading and trailing whitespaces.- Example:
${trim(" secret ")}➔"secret"
- Example:
4. Cryptographic Hashing & HMAC
${hash(algorithm, data)}: Generates a hexadecimal hash of the data string. Supported algorithms:md5,sha1,sha256.- Example:
${hash("sha256", "gherkio")}➔0f845d4c82c3c97d...
- Example:
${hmac(algorithm, key, message)}: Generates a hexadecimal keyed-hash message authentication code (HMAC). Supported algorithms:md5,sha1,sha256.- Example:
${hmac("sha256", "my-secret", "message-data")}➔a8d7c49f...
- Example:
📊 Variable Precedence
When variable names overlap under the same test execution context, Gherkio resolves the values in the following order of precedence (highest overrides lowest):
[1. Host Environment Variables]  <-- Sourced from host environment (GHERKIO_ prefix only)
               ↓
[2. Selected Account Credentials] <-- Loaded from active credential file
               ↓
[3. Step Saves]                  <-- Extracted dynamically from prior steps
               ↓
[4. Built-in Generators]         <-- Generated fresh per step
⚠️ Security Warning: Only host environment variables prefixed with
GHERKIO_are loaded. Normal environment variables likePATH,USER, orSECRET_KEYare ignored to prevent accidental leaks.
Credentials & Multi-Account Testing
Gherkio separates credential configurations from test scripts, enabling multi-role validation across local, staging, and production environments.
🔑 Directory & File Conventions
Credential maps live under .gherkio/credentials/<env>.yaml and match corresponding environments in .gherkio/environments/<env>.yaml.
Example: .gherkio/credentials/staging.yaml
accounts:
  admin:
    username: admin@host.com
    password: admin-secret-key
    role: super-admin
  viewer:
    username: viewer@host.com
    password: viewer-secret-key
    role: reader
⚡ Direct Cross-Account References
You can reference specific account credentials directly inside your YAML request body or headers using the $accounts.<name>.<field> notation. This allows cross-account testing without specifying an active user at the command line.
steps:
  - request:
      method: POST
      url: /auth/login
      body:
        username: $accounts.admin.username
        password: $accounts.admin.password
    expect:
      status: 200
🏃 Role-Based Command Execution
If you specify an active account flag via the CLI, Gherkio automatically injects all keys for that specific account into the root scope of the test scenario:
# Injects $username and $password automatically from the 'admin' map
gherkio run tests/my-test.yaml --env staging --account admin
You can also run a test suite against all configured accounts sequentially using --all-accounts:
gherkio run tests/my-test.yaml --env staging --all-accounts
Gherkio executes the scenario once for every account defined in the credentials file, ensuring consistent role boundaries.
Retry & Polling
In modern microservice and serverless systems, APIs are frequently eventually consistent. Gherkio offers native, step-level retry configurations to pull and assert against resources over time without writing custom loops.
🔁 Retry Key Reference
| Key | Type | Default | Description | Example |
|---|---|---|---|---|
attempts | integer | 3 | Maximum number of retry attempts to perform | attempts: 5 |
interval | string | 1s | Duration to wait between attempts | interval: 2s |
backoff | number | 1.0 | Multiplier applied to interval after each attempt | backoff: 1.5 |
maxInterval | string | 10s | Maximum boundary duration for exponential backoffs | maxInterval: 5s |
⚡ Eventually Consistent Polling Pattern
If a background job processes an asynchronous action (e.g. video processing or payment settlement), the status endpoint initially returns pending. We want to poll this endpoint until the status is completed or our retry limit is exceeded.
steps:
  - request:
      method: POST
      url: /jobs
      body: { type: "compress-video" }
    save:
      jobId: body.id

  - request:
      method: GET
      url: /jobs/$jobId
    retry:
      attempts: 10
      interval: 1s
      backoff: 1.5                   # 1s, 1.5s, 2.25s, 3.37s, etc.
      maxInterval: 5s
    expect:
      status: 200
      body.status: completed        # Retries until this assertion succeeds!
How Retries Work Under the Hood:
- Gherkio executes the HTTP request.
- It validates the response against the
expectblock. - If all assertions succeed, the step completes immediately.
- If any assertion fails, Gherkio waits for the specified
interval, updates the interval by multiplying it bybackoff(capped atmaxInterval), and re-executes the step. - If the maximum
attemptsthreshold is reached and assertions are still failing, the step fails, halting the scenario.
CLI Command & Reference
The Gherkio Command Line Interface (CLI) is the central orchestration tool for validating project settings, starting testing suites, generating reports, and exporting cURL workflows.
🏃 Execution Rules & File Resolution
When executing gherkio run <target>, Gherkio resolves the target pathway under the following rules:
- Directories: If
<target>is a folder, Gherkio recursively scans all child files ending in.yamlor.ymlunder the folder, executing them sequentially or concurrently. - Single Files: If
<target>points directly to a YAML file, Gherkio executes only that single file. - Workspace Discovery: Gherkio looks for a
.gherkio/config.yamlfile in the current working directory, then bubbles up parent directories until one is found. If no.gherkioworkspace folder is detected, Gherkio errors and prompts you to rungherkio init.
🚦 Exit Status Codes
Gherkio follows standard POSIX process exit boundaries to ensure perfect compatibility with CI/CD platforms (GitHub Actions, GitLab CI, Jenkins):
0: Success. All executed test scenarios passed, validation checks returned no warnings, or conversions completed successfully.1: Failure / Error. At least one step failed validation, an API returned a status/body mismatch, a syntax error was detected in your YAML files, or a microservice connection timed out.
🖥️ Print Output Modes
Modify how Gherkio logs information to terminal windows during execution using stdout flags:
- Default (Clean): Prints structured step checks, colorized status ticks (
✔/❌), and execution durations per step. - Verbose (
--verbose/-v): Outputs the exact request URL, method, serialized payload body, headers, along with the full response body/headers from the target host. Dynamic credentials and keys are automatically masked. - Quiet (
--quiet/-q): Suppresses standard output entirely, returning only the final summary block and process exit status code.
📚 Commands Map
| Command | Link | Description |
|---|---|---|
gherkio | gherkio | Root command showing general usage and flags. |
gherkio init | gherkio init | Scaffolds a new Gherkio workspace .gherkio/. |
gherkio run | gherkio run | Executes declarative test scenarios locally or in CI. |
gherkio convert | gherkio convert | Translates raw cURL statements ⇄ Gherkio YAML step formats. |
gherkio validate | gherkio validate | Performs static analysis checking on syntax, credentials, and schemas. |
gherkio schema | gherkio schema | Auto-generates Draft-07 JSON Schema for editor auto-completions. |
gherkio mcp | gherkio mcp | Launches stdio Model Context Protocol (MCP) JSON-RPC communication. |
gherkio
Gherkio is a testing and validation framework
Synopsis
Gherkio is a CLI tool for managing test execution, validation schemas, and generating reports.
Options
-h, --help help for gherkio
SEE ALSO
- gherkio convert - Convert cURL to Gherkio YAML or Gherkio YAML to cURL
- gherkio init - Initialize a new Gherkio project structure
- gherkio mcp - Start Gherkio Model Context Protocol (MCP) server over stdio
- gherkio run - Execute a test scenario
- gherkio schema - Generate JSON Schema for Gherkio YAML files
- gherkio validate - Validate a test file without executing HTTP requests
gherkio init
Initialize a new Gherkio project structure
Synopsis
Creates the .gherkio directory in the current working directory with the default project structure including config, environments, tests, reports, and schemas.
gherkio init [flags]
Options
-h, --help help for init
SEE ALSO
- gherkio - Gherkio is a testing and validation framework
gherkio run
Execute a test scenario
Synopsis
Executes a Gherkio test YAML file and displays the results.
If no test file is provided, all tests in .gherkio/tests/ are executed. If a directory is provided, all tests in that directory are executed.
The test file path is resolved in the following order:
- As provided (relative to current working directory)
- Relative to .gherkio/tests/ directory
Example:
  gherkio run                    # Run all tests
  gherkio run tests/login.yaml
  gherkio run restful-api/       # Run all tests in restful-api/ directory
  gherkio run login.yaml --env staging
  gherkio run login.yaml --verbose
  gherkio run login.yaml --report html
  gherkio run login.yaml --env staging --account alpha
  gherkio run login.yaml --env staging --all-accounts
  gherkio run login.yaml --section steps        # Run all steps in 'steps' section only
  gherkio run login.yaml --section setup        # Run all setup steps only
  gherkio run login.yaml --section teardown     # Run all teardown steps only
gherkio run [test-file] [flags]
Options
      --account string   Account name from credentials file (e.g. alpha, beta)
      --all-accounts     Run tests against all accounts in the credentials file
      --dry-run          Preview test execution without making HTTP requests
  -e, --env string       Environment to use (e.g. local, staging, production) (default "local")
  -h, --help             help for run
      --line int         Line number containing the step to run (default -1)
  -p, --parallel int     Number of tests to run in parallel (0 = auto-detect CPU count)
      --report string    Generate a report (format: html, json, or html,json)
      --report-raw       Skip sensitive data masking in JSON reports (cURL commands remain masked)
      --section string   Section to run (setup, steps, teardown). When used without --step or --line, runs ALL steps in that section only.
      --step int         Index of the step to run (0-indexed) (default -1)
  -t, --tag strings      Filter tests by tags (AND logic: test must have ALL specified tags)
  -u, --until string     Execute steps until a specific target, e.g. 'steps:1' or '2'
  -v, --verbose          Show full request/response payloads
SEE ALSO
- gherkio - Gherkio is a testing and validation framework
gherkio convert
Convert cURL to Gherkio YAML or Gherkio YAML to cURL
Synopsis
Bidirectionally converts between standard cURL commands and Gherkio DSL YAML.
cURL to YAML (Default)
Provide the cURL command as an argument, pipe it via stdin, or read from a file using --file. Automatically resolves environment base URLs and converts JSON bodies into native YAML.
YAML to cURL (Reverse)
Use the --reverse (-r) flag and provide the Gherkio test YAML file path. Optionally extract a specific step with --step.
Examples:
  # Convert cURL from argument
  gherkio convert "curl -X POST https://api.com/login -d '{\"user\":\"x\"}'"

  # Convert cURL from file to a YAML file
  gherkio convert --file curl.txt --output tests/login.yaml --scenario "Login Flow"

  # Convert YAML step back to cURL
  gherkio convert --reverse tests/login.yaml --step 0 --env staging
gherkio convert [command/test-file] [flags]
Options
      --account string    Account name from credentials file to interpolate variables
  -e, --env string        Environment to resolve base URLs (e.g. local, staging) (default "local")
  -f, --file string       Read cURL command from a file
  -h, --help              help for convert
  -o, --output string     Write output directly to a file
  -r, --reverse           Convert Gherkio step/YAML to cURL command(s)
  -s, --scenario string   Custom scenario name for the generated YAML (default "untitled")
      --step int          Index of the step to convert in reverse mode (0-indexed) (default -1)
      --step-only         Output just the step block without scenario wrapper
SEE ALSO
- gherkio - Gherkio is a testing and validation framework
gherkio validate
Validate a test file without executing HTTP requests
Synopsis
Performs static analysis on Gherkio test YAML files without making HTTP calls.
Validates:
- YAML syntax and structure
- Scenario structure (required fields)
- Request method validity
- Variable references ($var, $accounts.*, built-in generators)
- Account references from credentials
- Schema references from .gherkio/schemas/
- use file existence
- Retry configuration
Example:
  gherkio validate                           # Validate all test files
  gherkio validate login.yaml                # Validate single file
  gherkio validate --verbose                 # Show detailed results
  gherkio validate --env staging             # Validate with staging credentials
gherkio validate [test-file] [flags]
Options
  -e, --env string   Environment for credentials validation (default "local")
  -h, --help         help for validate
  -v, --verbose      Show detailed validation results
SEE ALSO
- gherkio - Gherkio is a testing and validation framework
gherkio schema
Generate JSON Schema for Gherkio YAML files
Synopsis
Generates a JSON Schema for Gherkio YAML files. This schema can be used in editors (like VSCode, Neovim) for autocomplete and validation.
Usage: gherkio schema # Generate all schemas (default) gherkio schema --type test # Generate only test file schema gherkio schema --type config # Generate only config schema gherkio schema --type environment # Generate only environment schema gherkio schema --type credentials # Generate only credentials schema gherkio schema --type schema-definition # Generate only schema definition schema gherkio schema --list # List available schema types
Output: By default, outputs all schemas in a single JSON file keyed by type. Use --type to output a specific schema only.
gherkio schema [flags]
Options
  -h, --help          help for schema
      --list          List available schema types
      --type string   Schema type: test, config, environment, credentials, schema-definition
SEE ALSO
- gherkio - Gherkio is a testing and validation framework
gherkio mcp
Start Gherkio Model Context Protocol (MCP) server over stdio
Synopsis
Starts the Gherkio Model Context Protocol (MCP) server over standard I/O (stdio). This allows Gherkio capabilities (globbing tests, reading scenarios, running tests, resolving environments) to be programmatically consumed by LLMs and agentic AI clients (e.g. Claude Desktop, VS Code extensions).
Stdout is strictly reserved for compliant JSON-RPC 2.0 frames. Diagnostic logs are output to Stderr.
gherkio mcp [flags]
Options
-h, --help help for mcp
SEE ALSO
- gherkio - Gherkio is a testing and validation framework
Shell Completions
Accelerate your terminal workflow by enabling Gherkio autocomplete support. Gherkio automatically outputs autocomplete scripts for Bash, Zsh, Fish, and PowerShell shells.
[!NOTE] Secure UNIX Design: For security and transparency, Gherkio never mutates your shell profiles or system files automatically. The
gherkio completioncommand strictly outputs the generated autocompletion script directly to standard output (stdout). Sourcing (source) or redirecting (>) the script gives you complete, explicit control over your terminal environment changes.
⚡ Generating Autocompletes
Generate the completion script matching your active shell using the gherkio completion command:
# Bash
gherkio completion bash

# Zsh
gherkio completion zsh

# Fish
gherkio completion fish

# PowerShell
gherkio completion powershell
🔌 Installing Completions Permanently
1. Zsh (macOS & Linux)
If shell completions are not already enabled in your environment, add this to your ~/.zshrc:
autoload -U compinit; compinit
Generate the Gherkio completion script and place it inside a directory listed in your $fpath:
gherkio completion zsh > "${fpath[1]}/_gherkio"
Alternatively, source it directly in your ~/.zshrc:
source <(gherkio completion zsh)
2. Bash (Linux)
Ensure bash-completion is installed using your package manager (e.g. apt-get install bash-completion or yum install bash-completion).
Write the completion script to the system global configuration:
gherkio completion bash | sudo tee /etc/bash_completion.d/gherkio > /dev/null
3. Fish
Write the completion script directly to your local user config folder:
gherkio completion fish > ~/.config/fish/completions/gherkio.fish
⚙️ Options
Disable Descriptions
By default, Gherkio completions include flag and subcommand descriptions. If you prefer a faster, minimalistic autocomplete output, you can disable descriptions using the --no-descriptions flag:
gherkio completion zsh --no-descriptions > "${fpath[1]}/_gherkio"
Integration Test Recipes
Welcome to the Gherkio Recipe Book! This section compiles production-grade design patterns and actionable code templates to solve complex, real-world integration testing challenges.
Rather than simple syntax references, these recipes show how to orchestrate high-performance, resilient, and secure test suites against live microservices.
🗺️ Recipe Catalogue
Select a recipe below to dive into real-world code templates and design patterns:
| Recipe | Core Use Case | Primary Focus |
|---|---|---|
| 🔑 Authentication & Token Recycling | Dynamic login, JWT claim extraction, and recycling bearer tokens. | Security & Identity |
| 📦 Bulk Upload & Collections | Submitting JSON sequences and asserting conditions across collections (all(), count()). | Data Pipelines & Lists |
| ❌ Negative & Error Validation | Verifying business constraints, bad payloads, and detailed API error shapes. | Contract Resilience |
| 🔄 Async Polling & Consistency | Handling eventual consistency and long-running tasks using dynamic backoff retries. | Event-Driven Systems |
| 🛡️ Multi-Account Role Boundaries | Asserting RBAC limitations and security boundaries across different users. | Authorization Security |
| 📐 Contract Verification with Schemas | Validating complex JSON bodies against centralized reusable schema rules. | Structural Testing |
| ⚡ Parallel Execution Safety | Orchestrating concurrent test runs securely using dynamic thread-safe parameters. | Performance & Speed |
| 🏗️ Database Seeding & Data Strategies | Setting up and tearing down transient data states to guarantee test isolation. | State Management |
💡 How to Use These Recipes
- Copy & Adapt: Each recipe includes a fully valid Gherkio DSL YAML snippet. Copy it into your
.gherkio/tests/directory and replace the mock URLs with your system's endpoints. - Utilize Environments: Combine these recipes with Gherkio's environment configurations (
.gherkio/environments/) to run the exact same tests acrosslocal,staging, andproductiontargets without code modifications. - Integrate with CI/CD: Combine Parallel Execution and Data Management strategies to execute hundreds of validation scenarios inside your GitHub Actions, GitLab CI, or Jenkins pipelines in seconds.
Authentication & JWT Token Recycling Flow
This recipe demonstrates how to authenticate a user dynamically, extract their access token, inspect decoded JWT claims, and inject the token into all subsequent request headers.
📝 The Scenario
scenario: Authenticated User Flow
tags:
  - security
  - authentication

steps:
  # Step 1: Login & obtain access token
  - request:
      method: POST
      url: https://api.my-domain.com/v1/auth/login
      headers:
        Content-Type: application/json
      body:
        username: $accounts.admin.username
        password: $accounts.admin.password
    expect:
      status: 200
      body.token: exists
      body.email: email

      # Assert decoded claims from response.token (accessToken)
      jwt.role: super-admin
      jwt.sub: uuid
      jwt.isActive: true
    save:
      # Extract token to $authToken variable
      authToken: body.token

  # Step 2: Use the dynamic token to query secure endpoints
  - request:
      method: GET
      url: https://api.my-domain.com/v1/secure/profile
      headers:
        Authorization: "Bearer ${authToken}"
    expect:
      status: 200
      body.role: super-admin
💡 Key Design Patterns Used
- Direct Credentials Extraction: Sourced securely from environmental configurations via
$accounts.admin.usernameto keep secrets out of version control. - Automatic JWT Assertion: The
jwt.<claim>keyword triggers standard JWT claim extraction under the hood on response fields matchingtokenoraccessToken. - Dynamic Variable Recycling: Using the
save:block to extract the token, then injecting it cleanly asAuthorization: "Bearer ${authToken}"in next step headers.
Bulk Upload & Collection Validation
This recipe demonstrates how to submit a list collection in a single POST request and assert properties across the returned array of created items.
📝 The Scenario
scenario: Bulk Item Upload Validation
tags:
  - bulk
  - catalog

steps:
  # Step 1: Submit bulk items list
  - request:
      method: POST
      url: /v1/products/bulk
      headers:
        Content-Type: application/json
      body:
        - sku: "LAP-CORE-I5"
          name: "Developer Laptop v1"
          price: 1200.00
        - sku: "LAP-CORE-I7"
          name: "Developer Laptop v2"
          price: 1800.00
    expect:
      status: 201
      body: array

      # Enforce array length is exactly 2
      count(body): 2

      # Validate every item in response matches criteria
      all(body.status): "active"
      all(body.sku): startsWith "LAP-"

      # Assert specific items in the list using indices
      body[0].sku: "LAP-CORE-I5"
      body[1].price: 1800.00
💡 Key Design Patterns Used
- Declarative Arrays: JSON arrays are mapped directly as standard YAML sequences under the
bodyfield. - Dynamic Collection Assertions:
count(body): 2evaluates array boundaries without looping scripts. - High-Level Array Matchers: The
all(<path>): <matcher>syntax validates fields on every member of an array.
Negative Testing & Error Validation
API contracts should explicitly enforce business constraints and output clean error bodies. Negative tests assert that requests containing bad payloads, invalid formatting, or missing authentication are successfully rejected by the server.
📝 The Scenario
scenario: Negative Profile Creation Checks
tags:
  - active
  - negative

steps:
  # Step 1: Attempt to register with a duplicate email
  - request:
      method: POST
      url: /v1/users
      body:
        email: "existing-user@my-domain.com"
        password: "securepassword"
    expect:
      status: 409
      body.error: "DuplicateEmail"
      body.message: contains "already exists"

  # Step 2: Attempt to submit a weak password
  - request:
      method: POST
      url: /v1/users
      body:
        email: $randomEmail
        password: "123"
    expect:
      status: 400
      body.code: "InvalidPassword"
      body.details.password[0]: contains "too short"

  # Step 3: Attempt to fetch billing without credentials
  - request:
      method: GET
      url: /v1/billing
    expect:
      status: 401
      body.error: "Unauthorized"
💡 Key Design Patterns Used
- Assert Non-2xx Responses: In Gherkio, steps expecting
4xxor5xxstatuses are fully expected and marked as green when the response matches. - Detailed Error Inspections: Using
containsassertions onbody.detailsarrays to ensure validation packages output helpful user guidance.
Async Polling & Eventual Consistency
Verify asynchronous operations (such as data pipeline synchronization or long-running audio processing jobs) that require time to complete.
📝 The Scenario
scenario: Async Order Sync Validation
tags:
  - async
  - orders

steps:
  # Step 1: Submit long-running order sync task
  - request:
      method: POST
      url: /v1/orders/sync
    expect:
      status: 202
      body.jobId: exists
    save:
      syncJobId: body.jobId

  # Step 2: Poll status endpoint with backoff until completed
  - request:
      method: GET
      url: /v1/orders/sync/$syncJobId
    retry:
      attempts: 8
      interval: 1500                 # Interval in milliseconds between retries
      backoff: exponential           # Backoff strategy: "linear" or "exponential"
      maxDuration: 10s               # Maximum total duration allowed for the retry loop
    expect:
      status: 200
      body.status: "success"
      body.processedCount: gt 0
      body.errors: empty
💡 Key Design Patterns Used
- Wait State Separation: Spares resources by avoiding a hardcoded script block that sleeps, utilizing standard intervals.
- Backoff Escalation: Gradually increases interval duration, giving slow-settling tasks a wider execution window while finishing quickly for fast jobs.
- Step Halting: If the status stays
pendingafter 8 attempts, Gherkio automatically fails the test run with detailed step diagnostic summaries.
Multi-Account Role Boundary Testing
Ensure your APIs isolate resources according to client roles. This recipe shows how to write a scenario validating role limits across multiple accounts.
📝 The Scenario
scenario: Role Boundary Validation
tags:
  - security
  - permissions

steps:
  # Step 1: Login as administrator to create resource
  - request:
      method: POST
      url: /v1/restricted-resource
      headers:
        Authorization: "Bearer ${adminToken}"   # adminToken saved in setup block
      body:
        title: "Confidential Strategy Document"
    expect:
      status: 201
    save:
      resourceId: body.id

  # Step 2: Attempt to read resource using viewer token
  - request:
      method: GET
      url: /v1/restricted-resource/$resourceId
      headers:
        Authorization: "Bearer ${viewerToken}"  # viewerToken saved in setup block
    expect:
      status: 200
      body.title: exists

  # Step 3: Attempt to delete resource as viewer (should fail)
  - request:
      method: DELETE
      url: /v1/restricted-resource/$resourceId
      headers:
        Authorization: "Bearer ${viewerToken}"
    expect:
      status: 403
      body.error: "PermissionDenied"
💡 Key Design Patterns Used
- Setup Token Caching: Authenticates once inside a
setupblock using credentials defined under.gherkio/credentials/staging.yamlfor bothadminandvieweraccounts. - Access Isolation Assertion: Direct verification of resource endpoints returning
403 Forbiddenfor restricted action blocks while successfully returning200 OKfor authorized actions.
Contract Verification with Schemas
Validate complex microservice structures against strict JSON Schema contracts with a single assertion line.
📝 The Scenario
scenario: Verify User List Contract
tags:
  - contract
  - users

steps:
  - request:
      method: GET
      url: /v1/users
      headers:
        Authorization: "Bearer ${adminToken}"
    expect:
      status: 200

      # Validates the response body against the target schema
      schema: users/list-response
📐 The Schema File: .gherkio/schemas/users/list-response.yaml
Define your structural contracts inside .gherkio/schemas/:
type: object
required:
  - users
  - pageInfo
properties:
  users:
    type: array
    items:
      type: object
      required:
        - id
        - name
        - email
      properties:
        id:
          type: string
          format: uuid
        name:
          type: string
        email:
          type: string
          format: email
  pageInfo:
    type: object
    required:
      - page
      - totalPages
    properties:
      page:
        type: integer
      totalPages:
        type: integer
💡 Key Design Patterns Used
- Zero-Boilerplate Checks: Validating deep collection trees, formats, and required field lists with one simple
schema:declaration. - Schema Reuse: The schema file can be referenced by multiple scenarios, ensuring changes to contracts are updated in one central location.
Parallel Execution Best Practices
To accelerate CI feedback loops, Gherkio supports multi-threaded, parallel test executions. However, running integration tests concurrently requires careful state separation.
⚡ Running Parallel Tests from the CLI
Run a directory of tests with custom concurrency levels using the --parallel (or -p) flag:
# Run tests with 4 parallel execution threads
gherkio run .gherkio/tests/ -p 4
⚠️ The Concurrent Mutation Problem
If multiple tests manipulate the exact same shared DB entity, race conditions will occur:
sequenceDiagram
    participant T1 as Test 1 (Edit Laptop Price)
    participant DB as Shared Database
    participant T2 as Test 2 (Assert Laptop Details)

    T1->>DB: UPDATE laptop WHERE id = 1 SET price = 10.00
    T2->>DB: GET laptop WHERE id = 1
    Note over T2: Asserts price == 12.00 (expected original)
    DB-->>T2: returns price = 10.00
    Note over T2: ❌ Test Failed!
🛡️ Key Safety Strategies
1. Isolated Dynamic Data
Avoid hardcoding entity identifiers or emails. Utilize Gherkio's dynamic generators to create unique resources per test thread:
steps:
  - request:
      method: POST
      url: /v1/users
      body:
        email: $randomEmail         # Unique email per thread!
        name: "Test User"
2. Microservice Routing Isolation
If your microservices support multi-tenant isolation, inject tenancy headers:
steps:
  - request:
      method: GET
      url: /v1/products
      headers:
        X-Tenant-ID: "tenant-${uuid}"  # Dynamic tenant separation
Database Seeding & Data Strategies
Ensure tests run in complete isolation and leave zero residue by designing robust setup and teardown architectures.
🏗️ Strategy A: Transient Setup & Teardown (Recommended)
In this model, every scenario creates its own resource during setup and deletes it during teardown.
scenario: Transient Resource Lifecycle
setup:
  - request:
      method: POST
      url: /items
      body: { name: "Temp Book" }
    save:
      bookId: body.id

steps:
  - request:
      method: PUT
      url: /items/$bookId
      body: { name: "Updated Book" }
    expect:
      status: 200

teardown:
  - request:
      method: DELETE
      url: /items/$bookId
    expect:
      status: 200
- Pros: Zero DB pollution, highly predictable, immune to concurrent execution conflicts.
- Cons: Adds additional HTTP calls per test scenario.
🏗️ Strategy B: Bulk Environmental Seeding
If tests require extensive reference lists (e.g. currency maps, country codes, permissions catalogues), create an environmental seeding script.
Map this initializer test at the very beginning of your pipeline:
# tests/00-seed.yaml
scenario: Seed Database
steps:
  - request:
      method: POST
      url: /admin/seed
      headers:
        X-Seed-Key: $accounts.admin.password
    expect:
      status: 200
Configure your test orchestrator to execute this scenario sequentially first, before running the remaining tests in parallel:
# Seed sequentially
gherkio run .gherkio/tests/00-seed.yaml

# Run tests in parallel
gherkio run .gherkio/tests/ -p 4
- Pros: Keeps individual scenario scripts small and extremely fast.
- Cons: Shared state must be read-only during parallel steps to prevent test interference.
Model Context Protocol (MCP) Server
Gherkio features native, built-in support for the Model Context Protocol (MCP), a standard JSON-RPC protocol initiated by Anthropic that allows AI models (like Gemini, Claude, or GPT) to interact securely and productively with local tools and files.
By running an MCP server, Gherkio enables AI agents to plan, write, validate, execute, and debug integration tests entirely in the background, transforming Gherkio from a simple CLI tool into an autonomous AI QA coworker.
🧭 Why Gherkio Integrates MCP
Without MCP, an AI assistant operates blindly inside your project:
- It doesn't know Gherkio's exact DSL grammar, available matchers, or configuration layouts, leading to syntax halluncinations.
- It cannot execute HTTP calls to verify if a test passes or fails.
- It cannot read environment and credential configurations to perform role-based checking.
With Gherkio's MCP server active, the AI assistant receives:
- Dynamic Tools (Capabilities): Can initialize workspaces, create/update test files, run tests in isolation, and perform static analysis checks.
- Native Resources: Read-only access to Gherkio's DSL specification, autocomplete JSON schemas, and canonical syntax examples.
🔌 Architecture & Connection Transport
Gherkio's MCP server uses a standardized stdio (standard input/output) connection transport.
When your editor (e.g. Cursor, VS Code, Zed) or AI desktop client (Claude Desktop) starts Gherkio, it launches a persistent background process:
graph TD
    subgraph HostClient ["AI Agent Client (Claude Desktop / Cursor IDE / Zed)"]
        A[AI Agent Engine]
    end
    subgraph GherkioMCPServer ["Gherkio MCP Process"]
        B[gherkio mcp daemon]
        C[Workspace Controller]
        D[Runner Engine]
    end
    subgraph ProjectWorkspace ["Filesystem & Network"]
        E[".gherkio/tests/ & .gherkio/schemas/"]
        F[Live HTTP API Endpoints]
    end

    A <-->|stdio JSON-RPC| B
    B --> C
    B --> D
    C <-->|Read / Write| E
    D <-->|Execute Tests| F
⚡ Client Integrations
Gherkio can be plugged directly into all major AI IDEs and clients. See the Setup Guide for detailed configuration blocks for:
- Claude Desktop
- Cursor IDE
- VS Code (via Roo Code / Continue)
- Zed Editor
MCP Server Setup & Editor Integrations
Learn how to connect Gherkio's Model Context Protocol (MCP) server to your favorite AI assistant clients, IDEs, and environments.
🚀 Connecting to Clients
You can connect Gherkio's Model Context Protocol (MCP) server to your client using two execution paths:
- Binary Mode (Standard): Invokes the locally installed
gherkio mcpexecutable. - Zero-Install Mode (Go Run): Dynamically fetches and runs the server using standard Go remote module execution:
go run github.com/muhfaris/gherkio@v0.1.0-alpha.5 mcp
🛠️ Configuration Blocks
1. Claude Desktop Setup
To enable Claude Desktop to invoke Gherkio's testing suite, add the server command to your local Claude configuration file:
- Mac Path:
~/Library/Application Support/Claude/claude_desktop_config.json - Windows Path:
%APPDATA%\Claude\claude_desktop_config.json
Option A: Local Binary (Recommended for speed)
{
  "mcpServers": {
    "gherkio": {
      "command": "gherkio",
      "args": ["mcp"],
      "env": {
        "PATH": "/usr/local/bin:/opt/homebrew/bin:/usr/bin"
      }
    }
  }
}
Option B: Zero-Install (Go Run)
{
  "mcpServers": {
    "gherkio": {
      "command": "go",
      "args": ["run", "github.com/muhfaris/gherkio@v0.1.0-alpha.5", "mcp"],
      "env": {
        "PATH": "/usr/local/bin:/opt/homebrew/bin:/usr/bin"
      }
    }
  }
}
2. Cursor IDE Integration
To use Gherkio dynamically within Cursor's Composer or Chat:
- Open Cursor Settings ➔ Features ➔ MCP.
- Click + Add New MCP Server.
- Configure the following fields:
Option A: Local Binary (Recommended for speed)
- Name:
gherkio - Type:
stdio - Command:
/absolute/path/to/gherkio mcp(e.g./home/username/go/bin/gherkio mcp)
Option B: Zero-Install (Go Run)
- Name:
gherkio - Type:
stdio - Command:
go run github.com/muhfaris/gherkio@v0.1.0-alpha.5 mcp
Click Save. The status dot should immediately turn green.
3. VS Code Integration (Roo Code / Continue)
If you use Roo Code (Roo Cline) or Continue extensions in VS Code, add Gherkio to your custom MCP servers list:
Option A: Local Binary (Recommended for speed)
{
  "mcpServers": {
    "gherkio": {
      "command": "gherkio",
      "args": ["mcp"]
    }
  }
}
Option B: Zero-Install (Go Run)
{
  "mcpServers": {
    "gherkio": {
      "command": "go",
      "args": ["run", "github.com/muhfaris/gherkio@v0.1.0-alpha.5", "mcp"]
    }
  }
}
4. Zed Editor Configuration
To activate Gherkio's MCP capabilities within the Zed editor's built-in assistant, edit your local ~/.config/zed/settings.json file:
Option A: Local Binary (Recommended for speed)
{
  "context_servers": {
    "gherkio": {
      "command": "gherkio",
      "args": ["mcp"]
    }
  }
}
Option B: Zero-Install (Go Run)
{
  "context_servers": {
    "gherkio": {
      "command": "go",
      "args": ["run", "github.com/muhfaris/gherkio@v0.1.0-alpha.5", "mcp"]
    }
  }
}
✅ Troubleshooting
Red / Offline Connection State
If your client fails to connect or Gherkio's status dot is red:
- Check PATH: Ensure the directory where
gherkiois installed (e.g./home/username/go/binor/usr/local/bin) is present in thePATHenvironment variable defined in the configuration block. - Execute manually: Run
gherkio mcpin your system shell. It should start silently and wait for stdin. PressCtrl+Cto terminate it. If it fails withcommand not found, re-run thego installprocedure.
MCP Tools Reference
Gherkio's Model Context Protocol (MCP) server exposes a rich suite of 21 tools that allow AI models (such as Gemini, Claude, or GPT) to interact natively with Gherkio test suites, config files, environments, credentials, schemas, and runners.
🛠️ Project & Workspace Tools
1. init_project
Initialize a new Gherkio project structure with default configuration, schemas, environments, and template examples in the specified directory.
- Arguments:
path(string, optional): Subdirectory or absolute path to initialize the Gherkio project. Defaults to the current working directory.
- Example call:
{
  "name": "init_project",
  "arguments": { "path": "my-api-tests" }
}
2. get_project_info
Retrieve active Gherkio project metadata, workspace root, and resolved directory structures.
- Arguments: None (returns project directory paths and version).
🧪 Scenario Management
3. list_tests
Scan and retrieve a list of all Gherkio test scenarios (.yaml files) inside .gherkio/tests/ with their step counts and scenario names.
- Arguments: None
4. read_test
Read the full raw Gherkio YAML test scenario contents of a given test file path.
- Arguments:
path(string, required): Absolute or relative path to the Gherkio scenario file.
5. create_test
Create a new Gherkio test scenario file in the project workspace under .gherkio/tests/. Statically validates syntax and schema references before writing to disk.
- Arguments:
path(string, required): Relative path under.gherkio/tests/to save the file (e.g.auth/login.yaml).scenarioYaml(string, required): Raw YAML string of the Gherkio test scenario. Rule: Always prefix saved/referenced dynamic variables with the sequential step number (e.g.,1-authTokenfor step 1,2-resourceIdfor step 2) for strict step-level traceability.
6. update_test
Overwrite an existing Gherkio test file scenario in the project workspace, writing a backup first.
- Arguments:
path(string, required): Absolute or relative path to the Gherkio scenario file to update.scenarioYaml(string, required): Updated Gherkio test scenario YAML content. Rule: Always prefix saved/referenced dynamic variables with the sequential step number (e.g.,1-authTokenfor step 1,2-resourceIdfor step 2) for strict step-level traceability.
7. delete_test
Permanently delete a Gherkio test file from the workspace.
- Arguments:
path(string, required): Absolute or relative path to the Gherkio scenario file to delete.
🏃 Execution & Validation
8. run_test
Execute a Gherkio test scenario (fully or step-isolated) and receive highly detailed, structured JSON results containing request headers/bodies, response details, timing budgets, and assertion outcomes.
- Arguments:
path(string, required): Absolute or relative path to the test scenario to run.env(string, optional): Environment to execute against (defaults to project config default orlocal).account(string, optional): Optional account name from environments credentials to use for dynamic variable injection.step(integer, optional): Step index to execute in isolation (0-indexed). Defaults to-1(run all).section(string, optional): Section to run (setup,steps,teardown).dryRun(boolean, optional): Preview test execution without making HTTP requests.verbose(boolean, optional): Show full request/response payloads. Defaults totrue.failFast(boolean, optional): Stop executing remaining steps when a step fails. Defaults tofalse.
9. validate_test
Validate a Gherkio scenario's syntax, structure, request methods, and schema/composition references without executing it.
- Arguments:
scenarioYaml(string, required): Gherkio YAML test scenario string to validate.
10. validate_workspace
Perform full, multi-file static analysis on all workspace tests, validating syntax, variable scopes, credentials, schema, and use: scenario references.
- Arguments:
path(string, optional): Optional path to a specific test file.env(string, optional): Optional environment (e.g.staging) to validate credential credentials schemas.
🔑 Environment & Credentials Management
11. list_environments
List all configured Gherkio test environments along with their baseUrl and overriding services.
- Arguments: None
12. create_environment
Create a new environment config file in .gherkio/environments/<name>.yaml.
- Arguments:
name(string, required): Environment name (e.g.,staging,production).yaml(string, required): Environment YAML content containingbaseUrland services.
13. update_environment
Update an existing environment config file in .gherkio/environments/<name>.yaml.
- Arguments:
name(string, required): Environment name to update.yaml(string, required): Updated environment YAML content.
14. read_credential
Read credentials for a specific environment.
- Arguments:
env(string, required): Environment name.
15. create_credential
Create a new credentials file for an environment under .gherkio/credentials/<env>.yaml.
- Arguments:
env(string, required): Environment name.yaml(string, required): Credentials YAML content with accounts mapping.
16. update_credential
Update an existing credentials file for an environment.
- Arguments:
env(string, required): Environment name.yaml(string, required): Updated credentials YAML content.
📐 Schema Validation
17. list_schemas
List all custom assertion schemas configured under .gherkio/schemas/ in the workspace.
- Arguments: None
18. create_schema
Create a new schema definition file in .gherkio/schemas/<name>.yaml.
- Arguments:
name(string, required): Schema name (e.g.user-profile).yaml(string, required): Schema YAML content defining expected structure.
19. update_schema
Update an existing schema definition file.
- Arguments:
name(string, required): Schema name to update.yaml(string, required): Updated schema YAML content.
🔁 cURL & DSL Conversion
20. convert_curl_to_yaml
Convert a raw cURL command string into a formatted Gherkio DSL YAML test scenario or step.
- Arguments:
curl(string, required): Raw cURL command string to parse and convert.scenarioName(string, optional): Optional custom scenario name wrapping the conversion. Defaults toConverted curl.stepOnly(boolean, optional): If true, returns only the individual step's YAML content rather than the full scenario wrapper.env(string, optional): Optional environment to interpolate and format base URL references.
21. convert_yaml_to_curl
Convert a Gherkio test scenario step (or all steps) into reproducible standard cURL commands.
- Arguments:
path(string, required): Relative or absolute path to the Gherkio test YAML file.step(integer, optional): Optional step index (0-indexed) to convert.env(string, optional): Optional environment name to load credentials.account(string, optional): Optional account name to interpolate credential variables.
MCP Resources Reference
Gherkio's Model Context Protocol (MCP) server exposes a set of 7 read-only resources containing the active DSL specifications, schema autocomplete files, canonical YAML test examples, available assertion matchers, variables, and project structures.
These resources are exposed directly to the AI model on connection, allowing it to quickly grasp the syntax and structure of the Gherkio test system without relying on outdated external training data.
📂 Available Resources
1. gherkio://dsl/spec
- Name: Gherkio DSL Grammar Spec
- MimeType:
text/markdown - Description: Contains the exact structural keys, step properties, request configurations, and variable interpolation guidelines for writing Gherkio tests.
2. gherkio://dsl/schema.json
- Name: Gherkio Autocomplete JSON Schema
- MimeType:
application/json - Description: The automatically generated Draft-07 JSON Schema mapping internal models to DSL fields. Excellent for AI code autocomplete.
3. gherkio://dsl/examples
- Name: Gherkio DSL Canonical Examples
- MimeType:
text/yaml - Description: Working code snippets illustrating requests, saves, assertions, compositions, and collection validation in action.
4. gherkio://dsl/matchers
- Name: Available Matchers
- MimeType:
application/json - Description: A comprehensive JSON map of all 25+ assertion matchers, detailing their expected syntax, type requirements, and behavior.
5. gherkio://dsl/variables
- Name: Built-in Variables
- MimeType:
application/json - Description: Documented built-in generator variables (
$uuid,$ulid,$randomInt,$randomEmail,$randomPhone) available natively in Gherkio test runs.
6. gherkio://dsl/paths
- Name: Canonical Paths
- MimeType:
application/json - Description: Explanation and examples of canonical dot-notation paths for assertions and saves (
body.*,headers.*,jwt.*).
7. gherkio://project/structure
- Name: Project Directory Structure
- MimeType:
text/markdown - Description: A breakdown of the Gherkio workspace configuration folder (
.gherkio/), explaining where configuration, environments, credentials, tests, reports, and schemas reside.
⚡ Reading a Resource
AI clients can read any resource by calling the resources/read protocol method:
{
  "method": "resources/read",
  "params": {
    "uri": "gherkio://dsl/spec"
  }
}
Gherkio returns the raw Markdown or JSON content directly, ensuring perfect, real-time sync with the codebase.
LLM Integration & AI Agents
Gherkio was built from the ground up to be AI-native. Its flat, descriptive, YAML-based Domain Specific Language (DSL) and standard Model Context Protocol (MCP) server make it exceptionally easy for LLMs (such as Gemini, Claude, or GPT) to write, parse, and execute integration tests.
This chapter outlines best practices for prompting AI models to build tests, and integrating Gherkio with agentic workflows.
🤖 Prompting LLMs for Test Generation
When asking an AI model to write or modify Gherkio tests, feed the model Gherkio's core grammar rules. Below is a highly optimized prompt template you can use:
You are an expert QA engineer specializing in Gherkio's declarative API testing framework.
Write a Gherkio YAML test scenario based on the following requirements:
- Target endpoint: POST /v1/checkout
- Request JSON Body: { "itemId": <uuid>, "quantity": <integer between 1 and 5> }
- Expected output: Status 201, return body.orderId as a UUID.
- Save body.orderId for subsequent steps.

Rules:
1. Use Gherkio's built-in generator $uuid for the itemId.
2. Use Gherkio's dynamic generator ${randomInt(1,5)} for the quantity.
3. Validate response status code and response type structures.
4. Always prefix any saved dynamic variables in the 'save' block with the step number (e.g. '1-createdOrderId' for step 1) to ensure strict cross-step traceability.
The AI model will output a flawless declarative schema matching Gherkio requirements:
scenario: Complete Item Checkout
steps:
  - request:
      method: POST
      url: /v1/checkout
      body:
        itemId: $uuid
        quantity: ${randomInt(1,5)}
    expect:
      status: 201
      body.orderId: uuid
    save:
      1-createdOrderId: body.orderId
🔌 Using MCP Tools Effectively in Agent Workflows
In agentic environments (such as Claude Desktop, Cursor, or specialized coder loops), Gherkio's MCP server empowers the model to run a complete, sandboxed test execution loop:
graph TD
    A[Agent receives QA Task] --> B[Agent calls: create_test]
    B --> C[Agent calls: run_test]
    C --> D{Tests Pass?}
    D -- No --> E[Agent calls: update_test to fix code/assertions]
    E --> C
    D -- Yes --> F[Agent reports success to human]
⚡ Recommended Agent Operations
- Static Analysis Pre-check: Prior to writing a test to disk, agents should utilize the
validate_testtool. This ensures the YAML syntax is valid and all referenced custom assertion schemas are properly mapped, preventing run-time parser crashes. - Step-Isolated Executions: For large end-to-end user journeys (e.g. 10 steps), running the entire scenario takes time. Agents can debug issues by isolating a single step using the
stepparameter inrun_test:{ "name": "run_test", "arguments": { "path": "tests/e2e/checkout.yaml", "step": 4 } } - Automatic cURL Conversion: When importing external manual tests, agents can translate curl logs directly into Gherkio step structures by calling
convert_curl_to_yaml.
Frequently Asked Questions
General
What is Gherkio?
Gherkio is a declarative integration testing platform that lets teams write API integration tests in pure YAML. It compiles to a single static Go binary with zero external runtime dependencies. Tests describe multi-step HTTP request sequences, extract variables, define rich assertions, and enforce security policies — all in a self-documenting YAML DSL.
What makes Gherkio different from Postman or Bruno?
Postman and Bruno are GUI-centric API clients. Gherkio is a CLI-first integration testing platform designed for CI/CD pipelines. Tests are plain YAML files that live in your repository, execute deterministically, and produce structured reports — no GUI required, no vendor lock-in.
Does Gherkio require Node.js, Python, or a JVM?
No. Gherkio is a single static Go binary with zero external runtime dependencies. It runs anywhere Go compiles — Linux, macOS, Windows, Docker, and even air-gapped environments.
Is Gherkio free and open source?
Yes. Gherkio is released under the MIT license and is fully open source. You can use it for personal projects, internal tools, and commercial products without restrictions.
Technical
What API styles does Gherkio support?
Gherkio's HTTP engine supports REST APIs, GraphQL endpoints (via JSON POST), and any HTTP-based API. Native gRPC support is on the roadmap.
How does Gherkio handle authentication?
Gherkio supports multi-account credentials, environment variable injection, automatic bearer token injection, cookie persistence, and sensitive field masking. You can run the same test against admin, user, and read-only accounts using gherkio run --all-accounts.
Can Gherkio validate response schemas?
Yes. Gherkio includes native JSON schema validation. Define your expected schema in .gherkio/schemas/ and assert against it inline:
expect:
  schema: user-response
Does Gherkio support retries and polling?
Yes. Gherkio includes a configurable retry engine with exponential backoff, fixed intervals, and status-based exit conditions for eventual consistency testing.
Can I reuse scenarios across test files?
Yes. Gherkio supports scenario composition with the use: keyword, letting you compose complex test flows from reusable building blocks.
CI/CD & Automation
Can Gherkio integrate with my CI/CD pipeline?
Yes. Gherkio produces POSIX exit codes, structured JSON reports, and machine-readable output. It integrates with GitHub Actions, GitLab CI, Jenkins, CircleCI, and any CI platform that can run a Go binary.
Does Gherkio support parallel test execution?
Yes. Use the -p or --parallel flag to control concurrency: gherkio run . -p 4.
Can Gherkio run tests against multiple environments?
Yes. Gherkio supports environment profiles defined in .gherkio/environments/. Switch between local, staging, and production configurations without modifying test files.
AI Integration
Can AI coding assistants write Gherkio tests?
Yes. Gherkio ships with a native Model Context Protocol (MCP) server that exposes your testing sandbox to AI assistants. Tools like Cursor, Claude Desktop, Cline, and Copilot can read specifications, generate scenarios, validate structures, and run tests using natural language.
How do I set up the MCP server?
See the MCP Setup Guide for configuration blocks for Claude Desktop, Cursor, VS Code, Zed, and Neovim.
Troubleshooting
How do I convert existing cURL commands to Gherkio YAML?
Use the CLI: gherkio convert --curl "curl -X POST https://api.example.com/login". Or use the Interactive Playground for a visual cURL-to-YAML translator.
How do I debug a failing test?
Run your test with the -v (verbose) flag to see full request/response payloads, assertion results, and execution traces. Gherkio also generates structured HTML and JSON reports under .gherkio/reports/.
Where can I get help?
- Open an issue on GitHub
- Check the Changelog for recent changes and known issues
- Review the Contributing Guide for development questions
Global Configuration (config.yaml)
The config.yaml file located in .gherkio/config.yaml defines project metadata, execution targets, schema paths, auto-masking configurations, and reporting defaults.
📝 Complete Configuration Schema
Here is a fully documented, production-ready example of the config.yaml layout:
# Unique identifier of Gherkio project
project:
  name: billing-system
  version: "1.0.0"

# Target environment mapping rules
environments:
  default: local                    # Sourced if --env flag is omitted

# Core directory conventions
tests:
  path: tests                       # Location of test scripts under .gherkio/

schemas:
  path: schemas                     # Location of validation schemas under .gherkio/

# Log security and sensitive field masking
security:
  mask:
    enabled: true                   # Enable dynamic log sanitization
    fields:
      - token
      - password
      - secret
      - creditCard
      - customSecret

# Automation run reports
reports:
  format: html                      # 'html' or 'json'
  directory: reports                # Directory to compile results under .gherkio/
⚙️ Key Configuration Details
1. security.mask (Sensitive Fields)
To guarantee security compliance during test suite executions (such as in public CI runner logs), Gherkio scans all request and response payloads.
If any field name matches the lists under security.mask.fields, Gherkio automatically replaces its value with [MASKED] in stdout printing, raw tracebacks, and compiled reports.
2. reports (Test Artifact Compilation)
Every gherkio run execution outputs a clean JSON report by default. If format: html is selected, Gherkio compiles a responsive, dark-mode single-page HTML report summarizing performance metrics, request-response payloads, and assertions.
Environments Configuration
Target different deployment environments dynamically. All configurations are stored as standard YAML files inside the .gherkio/environments/ directory.
📝 Directory Resolution & Naming
Gherkio matches the environment filename with the CLI --env (or -e) execution flag:
--env staging➔ loads.gherkio/environments/staging.yaml--env local➔ loads.gherkio/environments/local.yaml
⚙️ Environment YAML Properties
| Key | Type | Required | Description | Example |
|---|---|---|---|---|
baseUrl | string | Yes | Target domain for relative requests | baseUrl: https://api.staging.net |
services | object | No | Microservice override pathways | (See below) |
⚡ Microservice Endpoint Overrides
In multi-service networks, different features (identity, checkout, inventory) are hosted on independent servers. Use the services map to cleanly route specific API requests:
# .gherkio/environments/staging.yaml
baseUrl: https://staging.my-company.com

services:
  identity: https://auth-staging.my-company.net
  checkout: https://checkout-staging.my-company.net
When writing a step, reference the service key:
steps:
  # Routes to https://auth-staging.my-company.net/v1/token
  - request:
      service: identity
      method: POST
      url: /v1/token
This allows you to migrate identical testing logic between local (where all services run on local ports) and production with zero script modifications.
Credentials File Layout
Manage test account usernames, passwords, API keys, and client secrets securely. Credentials map to target environments and are stored inside .gherkio/credentials/.
🔒 Directory Convention & Security
Credentials files are mapped exactly to environments:
--env stagingloads.gherkio/credentials/staging.yamlif it exists.
[!CAUTION] Add
.gherkio/credentials/*.yamlto your project's.gitignorefile to ensure sensitive client secrets are never committed to version control.
📝 Credentials YAML Layout
# .gherkio/credentials/staging.yaml
accounts:
  # Account Role key
  admin:
    username: admin@company.com
    password: super-secret-key-1
    clientId: cid_12389

  # Additional Account Roles
  manager:
    username: manager@company.com
    password: manager-secret-key
    clientId: cid_45678
⚡ Referencing Credentials in DSL
Gherkio makes all variables nested inside an account map immediately available inside test scenarios via two pathways:
1. Direct Explicit Variable Binding
Use $accounts.<role>.<field> to reference any credential property explicitly:
steps:
  - request:
      method: POST
      url: /login
      body:
        email: $accounts.admin.username
        pass: $accounts.admin.password
2. Contextual Active Role Auto-Injection
If you execute the test run specifying a selected account, Gherkio dynamically flattens the account keys directly into the root context:
gherkio run my-test.yaml --env staging --account manager
Now, inside the test, you can directly reference $username and $password without specifying the account role prefix:
steps:
  - request:
      method: POST
      url: /login
      body:
        email: $username            # Dynamically binds to manager@company.com
        pass: $password            # Dynamically binds to manager-secret-key
This is the ultimate pattern for verifying role isolation boundaries with identical test scripts.
Schema Definitions Layout
Define structural response validation schemas under .gherkio/schemas/ to enforce robust API contracts.
📏 Specification Standards
Gherkio natively parses schemas conforming to the JSON Schema Draft-07 specification. You can define schemas as standard JSON (.json) or YAML (.yaml/.yml).
📝 Canonical Schema Layout Example
Example: .gherkio/schemas/auth/token-payload.yaml
$schema: "http://json-schema.org/draft-07/schema#"
type: object
required:
  - token
  - expiresAt
  - user
properties:
  token:
    type: string
    pattern: "^eyJ[A-Za-z0-9-_=]+\\.[A-Za-z0-9-_=]+\\.?[A-Za-z0-9-_.+/=]*$" # Simple JWT format regex
  expiresAt:
    type: string
    format: date-time
  user:
    type: object
    required:
      - id
      - email
    properties:
      id:
        type: string
        format: uuid
      email:
        type: string
        format: email
⚡ Asserting the Schema inside steps
Refer to the relative path of the schema file (omitting the extension) under the expect block:
steps:
  - request:
      method: POST
      url: /v1/auth/token
    expect:
      status: 200
      schema: auth/token-payload     # References .gherkio/schemas/auth/token-payload.yaml
If the server response contains a different structure (e.g. expiresAt is a number, or user.id is not a valid UUID), the test run halts with high-precision validation tracebacks.
Test Reports & Run Results
Gherkio produces structured output in two forms: console output (immediate, ephemeral) and saved reports (persistent, shareable).
Console Output
When you run gherkio run, each step is printed to stdout with its result:
✓ POST https://dummyjson.com/auth/login
  ✓ status = 200
  ✓ body.exists = true
  ✓ body.username = emilys
  Duration: 312ms

✓ GET https://dummyjson.com/users/1
  ✓ status = 200
  ✓ body.id = 1
  Duration: 89ms

✓ PASS
2 passed, 0 failed, 2 total
Duration: 401ms
Pass/Fail Indicators
| Symbol | Meaning |
|---|---|
✓ | Step or assertion passed |
✗ | Step or assertion failed |
→ | Redirected (HTTP 3xx) |
Failure Output
When a step fails, Gherkio prints the failed assertion details plus the full response:
✗ POST https://petstore.swagger.io/v2/pet/1
  ✗ status = 200 (expected), got 404
  ✗ body.id exists (path not found)

Available fields:
  - message
  - statusCode

Response:
Status: 404

Body:
{
  "message": "Pet not found"
}
Gherkio also extracts available JSON fields when a path is not found, so you can quickly correct your assertion path.
Verbose Output
Use --verbose to show full request and response bodies:
gherkio run tests/login.yaml --verbose
Sensitive fields (password, token, secret, creditCard, etc.) are always masked in console output.
Saved Reports
Reports are generated only when you add the --report flag:
gherkio run tests/login.yaml --report html          # HTML report
gherkio run tests/login.yaml --report json          # JSON report
gherkio run tests/login.yaml --report html,json     # Both formats
Report Directory Structure
Reports are saved under .gherkio/reports/:
.gherkio/reports/
├── latest/                           # most recent run (overwritten each time)
│   ├── report.html
│   └── report.json
├── 20260610_143052/                 # timestamped copy
│   ├── report.html
│   └── report.json
└── failures/                         # individual failed step snapshots
    └── failure-<Scenario>-<StepName>-step<N>-<timestamp>.json
The latest/ directory is always overwritten with the most recent run. Timestamp directories preserve historical runs indefinitely (no automatic cleanup by default).
HTML Report
The HTML report is a self-contained file with no external dependencies - all CSS and JavaScript are inlined. Open it in any browser.
Example: An actual HTML report from the petstore test suite looks like this (open .gherkio/reports/latest/report.html in your browser to explore it interactively):
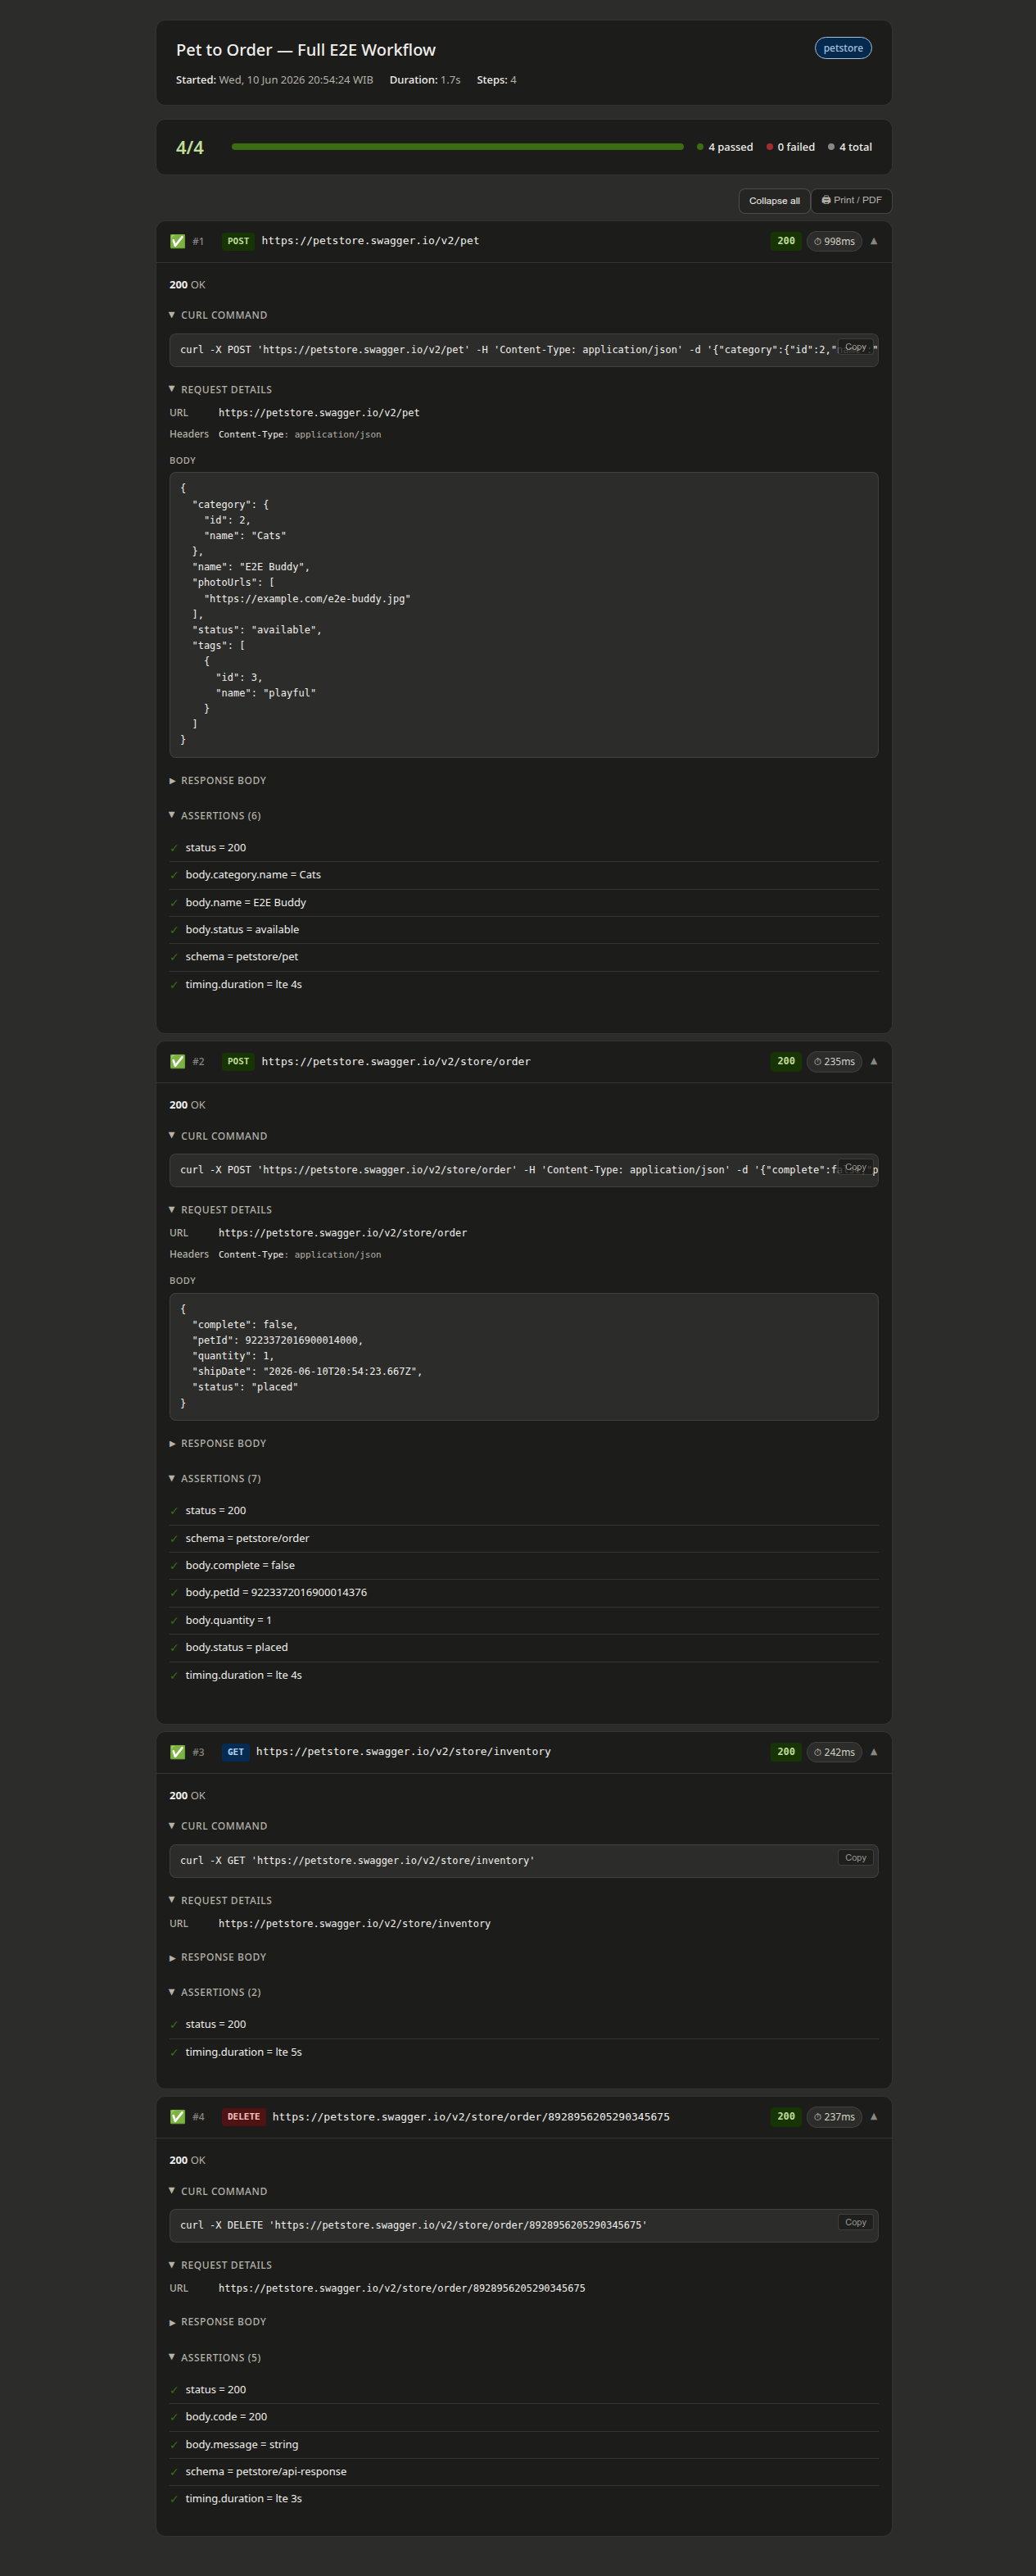
Features:
- Dark/light mode via CSS media query
- Expandable step sections (collapsed by default, failed steps auto-expand)
- Pass/fail badges per step with HTTP status code coloring
- Response time badge on each step (turns red if a timing.max assertion failed)
- Copyable cURL command per step (reproduce the exact request in your terminal)
- Copyable request ID badge (if the server returns x-request-id or similar headers)
- Expand All / Collapse All toolbar toggle
- Sensitive values masked automatically
JSON Report
The JSON report is machine-readable and ideal for CI/CD pipelines, historical analysis, or custom dashboards.
Report structure:
{
  "metadata": {
    "version": "1.0.0",
    "timestamp": "2026-06-10T14:30:00Z",
    "duration": 401,
    "scenario": "login example",
    "testFile": "tests/auth/login.yaml",
    "environment": "local"
  },
  "summary": {
    "total": 2,
    "passed": 2,
    "failed": 0,
    "passedPercent": 100
  },
  "steps": [
    {
      "index": 0,
      "label": "POST https://dummyjson.com/auth/login",
      "duration": 312,
      "durationLabel": "312ms",
      "passed": true,
      "curl": "curl -X POST 'https://dummyjson.com/auth/login' -H 'Content-Type: application/json' -d '{"username":"emilys","password":"***masked***"}'",
      "request": {
        "method": "POST",
        "url": "https://dummyjson.com/auth/login",
        "headers": { "Content-Type": "application/json" },
        "body": { "username": "emilys", "password": "***masked***" }
      },
      "response": {
        "status": 200,
        "headers": { "Content-Type": "application/json", "x-request-id": "req_abc123" },
        "body": { "accessToken": "***masked***", "username": "emilys", "id": 1 }
      },
      "requestId": "req_abc123",
      "assertions": [
        { "path": "status", "expected": "200", "actual": "200", "passed": true },
        { "path": "body.accessToken", "expected": "exists", "actual": "***masked***", "passed": true }
      ]
    }
  ],
  "errors": []
}
Key fields per step:
| Field | Description |
|---|---|
duration / durationLabel | Step duration in milliseconds and human-readable form |
curl | Copy-pasteable cURL command with sensitive values masked |
requestId | Tracing ID extracted from response headers (x-request-id, x-trace-id, request-id, etc.) |
assertions | Each assertion with path, expected, actual, and pass/fail status |
Raw Reports (Unmasked)
By default, sensitive values are masked in JSON reports. To generate an unmasked report:
gherkio run tests/login.yaml --report json --report-raw
The --report-raw flag only affects JSON reports. HTML reports and cURL commands always mask sensitive values regardless of this flag.
Failure Snapshots
When a step fails, Gherkio also saves an individual JSON snapshot in .gherkio/reports/failures/:
{
  "timestamp": "2026-05-31T03:17:41.744Z",
  "scenario": "Delete a Pet (DELETE)",
  "testFile": "tests/petstore/01-pet/05-delete-pet.yaml",
  "failedStepIndex": 0,
  "failedStepLine": 3,
  "role": "steps",
  "error": "assertion status failed: expected 200, got 404",
  "diagnostics": {
    "request": { "method": "DELETE", "url": "https://petstore.swagger.io/v2/pet/1", "headers": {}, "body": null },
    "response": { "statusCode": 404, "durationMs": 260, "headers": {...}, "body": null },
    "variableStoreAtFailure": { "randomEmail": "user_552580@example.com", ... }
  }
}
These snapshots capture the full request/response context at failure time, including the variable store state, making it easy to debug flaky or environment-specific failures.
Configuration
Reports can be configured in .gherkio/config.yaml:
reports:
  format: html        # default format when --report is omitted
  directory: reports  # directory under .gherkio/ (default: reports)
The --report CLI flag always overrides the config setting for a given run.
CI/CD Integration
Use the JSON report for CI/CD ingestion:
gherkio run --report json --env ci

# Exit code 0 = all passed, exit code 1 = one or more failed
Parse the summary object for pass/fail counts:
cat .gherkio/reports/latest/report.json | jq .summary
# { "total": 4, "passed": 4, "failed": 0, "passedPercent": 100 }
Contributing Overview
Thank you for helping build Gherkio! This guide helps you get up to speed with setting up your local Go development environment, building the CLI, and running the test suite.
🛠️ 1. Local Development Setup
Prerequisites
- Go: Version 1.25+ installed on your system.
Scaffold & Run
Build the CLI tool locally and run tests directly:
# Build the binary
go build -o gherkio .

# Initialize a default playground project
./gherkio init

# Run a test scenario
./gherkio run example/login.yaml -v
🧪 2. Test Suite & Validation
Gherkio takes testing seriously. Please ensure all tests pass before submitting any pull requests.
Running Go Tests
Run the entire Go test suite:
go test ./...
Run tests on a specific package (e.g., the runner engine):
go test -v ./internal/runner/
Golden File Snapshot Tests
Printer rendering tests inside /internal/runner/ use golden snapshot files (stored under internal/runner/testdata/) to compare exact terminal printer bytes.
If you intentionally alter terminal output formatting, regenerate these snapshot files using the -update flag:
go test ./internal/runner/ -update
📝 3. Git Commit Standards
We use the Conventional Commits specification to keep the Git history clean and readable:
feat: add between matcher for numeric boundsfix: resolve memory leak on retry exponential backoffdocs: update recipes with JWT token authenticationtest: expand coverage on built-in generators
Codebase Architecture
Understand Gherkio's package structures, compilation hierarchy, and execution control flows.
📁 Core Package Hierarchy
Gherkio's codebase is designed with modularity, strong decoupling, and easy testability in mind:
cmd/: CLI command interfaces powered by Cobra. Each subcommand (e.g.run,init,validate) registers itself via Go packageinit()functions to the unexported root command.internal/parser/: Reads YAML Gherkio DSL files, performs syntactic structural parsing, checks schema validity, and compiles raw strings into Go struct schemas.internal/runner/: The core execution engine. Handles the sequence state machine, processes HTTP requests, manages dynamic variable interpolation, evaluates assertions against matchers, and prints terminal logs.internal/mcp/: A programmatic Model Context Protocol (MCP) server stdio wrapper, exposing parser, workspace, and runner capabilities directly to AI models.internal/report/: Generates and compiles HTML/JSON integration report assets.
⚡ Execution Control Flow
When a developer runs gherkio run <file>, the engine follows this linear sequence:
graph TD
    A[Cobra Command CLI] --> B[Parser: Read & Validate DSL]
    B --> C[Workspace: Load Config & Environment]
    C --> D[Runner: Initialize Execution Context]
    D --> E[Runner: Run SETUP steps]
    E -- Success --> F[Runner: Run Main STEPS]
    E -- Failure --> G[Skip Main STEPS]
    F --> H[Runner: Run TEARDOWN steps]
    G --> H
    H --> I[Report: Compile HTML/JSON Logs]
    I --> J[Exit with Status Code]
Adding a Custom Matcher
Gherkio's assertion engine is designed to be easily extensible. All matchers live under internal/runner/matchers.go.
🛠️ Step-by-Step Walkthrough
Follow these three simple steps to implement a custom matcher (for example, a between matcher to check if a numeric response is inside bounds):
Step 1: Register the Matcher Keyword
Open internal/runner/matchers.go and add the keyword to the slice of known matchers inside GetAvailableMatchers():
func GetAvailableMatchers() []string {
	return []string{
		"exists", "not exists", "uuid", "email", // ...
		"between", // <-- Register your matcher keyword here
	}
}
Step 2: Implement the Evaluation Logic
Add the evaluation logic inside evaluateAssertion or helper dispatcher functions in the same file. Parse arguments if your matcher takes inputs (e.g. between 1 10):
if strings.HasPrefix(expectedStr, "between ") {
	args := strings.TrimPrefix(expectedStr, "between ")
	parts := strings.Fields(args)
	if len(parts) != 2 {
		return AssertionResult{Passed: false, Reason: "between requires 2 arguments (min, max)"}
	}

	// Parse min and max as float64, compare against actual numeric value, and return:
	// return AssertionResult{Passed: true}
}
Step 3: Add Unit Tests
Open internal/runner/matchers_test.go and append test cases validating both passing and failing assertions:
func TestMatchers(t *testing.T) {
	// Add test cases for your new matcher:
	// AssertPass(t, "between 1 10", 5)
	// AssertFail(t, "between 1 10", 12)
}
Ensure your tests pass perfectly by running go test -v ./internal/runner/.
Deploying to GitHub Pages
Gherkio's developer documentation is built as a static HTML site using mdBook. Because of this static, zero-runtime architecture, hosting and serving your documentation via GitHub Pages is fully supported, completely free, and takes under 2 minutes.
⚡ Method 1: Automated Deployment via GitHub Actions (Recommended)
The most robust way to host your documentation is by using GitHub Actions. This automates the build process: every time you push edits to the main branch, the pipeline regenerates Cobra CLI subcommand manual pages, compiles the static HTML files, and deploys them to GitHub Pages.
1. Add the Workflow File
Create a new workflow file at .github/workflows/deploy-docs.yml inside your repository:
name: Deploy Developer Documentation

on:
  push:
    branches:
      - main
  workflow_dispatch:

permissions:
  contents: read
  pages: write
  id-token: write

concurrency:
  group: "pages"
  cancel-in-progress: false

jobs:
  deploy:
    environment:
      name: github-pages
      url: ${{ steps.deployment.outputs.page_url }}
    runs-on: ubuntu-latest
    steps:
      - name: Checkout Repository
        uses: actions/checkout@v4

      - name: Setup Go Environment
        uses: actions/setup-go@v5
        with:
          go-version: '1.25'
          cache: true

      - name: Install mdBook
        run: |
          MDBOOK_VERSION="v0.4.43"
          curl -sSL "https://github.com/rust-lang/mdBook/releases/download/${MDBOOK_VERSION}/mdbook-${MDBOOK_VERSION}-x86_64-unknown-linux-gnu.tar.gz" | tar -xz
          sudo mv mdbook /usr/local/bin/
          mdbook --version

      - name: Build Documentation
        run: |
          make docs-build

      - name: Setup GitHub Pages
        uses: actions/configure-pages@v4

      - name: Upload Static Assets Artifact
        uses: actions/upload-pages-artifact@v3
        with:
          path: 'docs/book/book'

      - name: Deploy to GitHub Pages
        id: deployment
        uses: actions/deploy-pages@v4
2. Configure GitHub Repository Settings
- Go to your repository on GitHub.
- Navigate to Settings ➔ Pages (under the "Code and automation" section).
- Under Build and deployment, set the Source dropdown to GitHub Actions.
- Push your workflow file to
main. The deployment action will fire, and your live URL will be active within seconds!
🏗️ Method 2: Manual Local Build & Push
If you prefer to compile the book locally and push the static bundle directly to a dedicated gh-pages branch without using GitHub Actions:
1. Build the Static HTML
Run the local compilation tool to generate output files under docs/book/book/:
make docs-build
2. Push to gh-pages
You can use standard Git commands or a deployment utility (such as the gh-pages npm package or simple scripting) to push the contents of docs/book/book/ to your gh-pages branch:
# Example quick-script to publish static output
cd docs/book/book
git init
git checkout -b gh-pages
git add .
git commit -m "docs: deploy static developer book manually"
git remote add origin https://github.com/muhfaris/gherkio.git
git push -f origin gh-pages
🎨 Premium Offline Features Compatibility
All custom static page features implemented in Gherkio's mdBook layout — including offline visual Mermaid Flowcharts and local assets — work flawlessly when hosted on GitHub Pages:
- No External CDNs: Mermaid rendering relies strictly on the pre-compiled
mermaid.min.jsandmermaid-init.jsassets bundled inside the workspace. GitHub Pages serves these local files securely under standard HTTPS parameters. - SEO-Friendly Output: mdBook generates semantic, indexing-friendly static HTML files. Search engines (like Google and DuckDuckGo) can crawl and index your DSL specifications instantly out-of-the-box.
Changelog
All notable changes to Gherkio will be documented in this file.
The format is based on Keep a Changelog, and this project adheres to Semantic Versioning.
[0.1.0-alpha.2] - 2026-05-29
Added
- Gherkio Developer Book: Introduced a fully-fledged developer guide containing 23 chapters built with mdBook covering CLI tools, DSL syntax, and advanced recipes.
- Interactive Browser Playground: Added a self-contained, offline-first visual interface supporting:
- Visual DSL Stepper: Dynamic execution flowchart rendering.
- cURL ↔ YAML Step Translator: Real-time legacy terminal logs conversion.
- Hosted GitHub Pages Support: Configured static deploy workflows to serve both the developer book and the playground in a unified workspace.
- Stunning System Architecture Visual: Embedded a premium, dark-mode glassmorphic diagram explaining Gherkio's MCP daemon and execution flow.
- Expanded Phone Number Support: Added broader localized randomized phone number formats supporting international validations.
Fixed
- Fixed playground asset bundling path mapping inside the
docs-buildcompilation targets. - Corrected search index generation schemas for mdBook chapter queries.
[0.1.0-alpha.1] - 2026-05-20
Added
- RFC-18 Automated Failure Debug Snapshots: Auto-capturing raw request/response payload snapshots during test failures.
- RFC-19 Domain Sandboxing & SSRF Prevention: Outbound network sandboxing policies with user-configurable allowlists and blocklists.
- RFC-21 Multipart Form-Data & File Upload: Streaming of multipart files via Go
io.Pipe. - Dynamic Parameterized Generators: Parameterized variable generators supporting offset dates and randomized values.
- Expanded MCP Server Tools: Exposing
gherkio init,gherkio validate, andgherkio convertdirectly as discoverable tools in the MCP layer. - Cobra CLI Doc Generator: Automatically building Cobra CLI manual pages to markdown.
[0.1.0-alpha] - 2026-05-15
Added
- Core Declarative Engine: Sequential HTTP requests, responses, headers, and parameter binding.
- Value Matchers & Negative Assertions: Core validations (
exists,equals,contains,matches,not exists,schema: not <name>). - Setup & Teardown Blocks: Scenario setup and error-tolerant teardown block executions.
- Retry & Polling Loops: Configurable attempts, interval timers, and linear backoff algorithms.
- Multi-Account Credentials Management: Namespaced credentials loader with safe YAML integrations.